Install and setup cowrie honeypot on Ubuntu

How to install and setup cowrie honeypot on Ubuntu?
Overview: This article describes how to install and set up the Cowrie honeypot on Ubuntu by changing the SSH port, installing dependencies, setting up a virtual environment, configuring Cowrie, redirecting traffic via iptables, and running the honeypot to log attacker activity.
What is Cowrie honeypot?
The Cowrie honeypot is designed to impersonate SSH servers, specifically one with easily cracked credentials. Once an attacker logs in they will be accessing a fake Linux shell where they can execute commands which will look realistic. It will record all the sessions of an attacker. With Cowrie, the attacker will think they have hacked/attacked your server as if it was real. When an attacker tries to log into your server with the right username and password, the system will let them access a fake system in which they are not supposed to be. Honeypot keeps records of the attacker such as the commands he typed or the keys he pressed and all the activities of the attacker.
The hosts SSH daemon will run on a highest port which is 22222, Cowrie will run on 2222, and port 22 (default SSH) will be redirected to 2222 using iptables. When the attacker connects to port 22 it will be redirected to our Honeypot on port 2222.
How to install Cowrie?
Before installing cowrie and our dependencies, change the default SSH port 22 to port 22222 in sshd_config file so that the attacker thinks that they are in real SSH port and restart SSH to see if it is listening to the newly configured port.
root@localhost:~# vi /etc/ssh/sshd_config
Replace port 22 with the highest port 22222 and restart ssh
root@localhost:~# systemctl restart ssh
root@localhost:~# systemctl status ssh
To confirm if it is listening to the newly configured port run the below command:
ssh [your-username]@localhost -p 22222
Now install cowrie honeypot on ubuntu
Step 1. Update the system
root@localhost:~# apt update
Step 2. Install all the dependencies of Cowrie
root@localhost:~# apt-get install git python-virtualenv libssl-dev build-essential libpython-dev python2.7-minimal authbind
Step 3. Add a user Cowrie
root@localhost:~# adduser --disabled-password cowrie
Step 4. Login in to the new user account Cowrie
root@localhost:~# su - cowrie
Step 5. Download the code for cowrie.
cowrie@localhost:~$ git clone http://github.com/micheloosterhof/cowrie
Step 6. Move into cowrie folder and create a new virtual environment for the tool by running the command below.
cowrie@localhost:~$cd cowrie/
cowrie@localhost:~/cowrie$ virtualenv cowrie-env
Step 7. Activate this new virtual environment.
cowrie@localhost:~/cowrie$ source cowrie-env/bin/activate
Step 8. Install the packages of Python that Cowrie needs to run
(cowrie-env) cowrie@localhost:~/cowrie$ pip install --upgrade pip
(cowrie-env) cowrie@localhost:~/cowrie$ pip install --upgrade -r requirements.txt
Step 9. Create a copy of cowrie.cfg.dist so that we can edit that config file.
(cowrie-env) cowrie@localhost:~/cowrie$ cd etc/
(cowrie-env) cowrie@localhost:~/cowrie/etc$ cp cowrie.cfg.dist cowrie.cfg
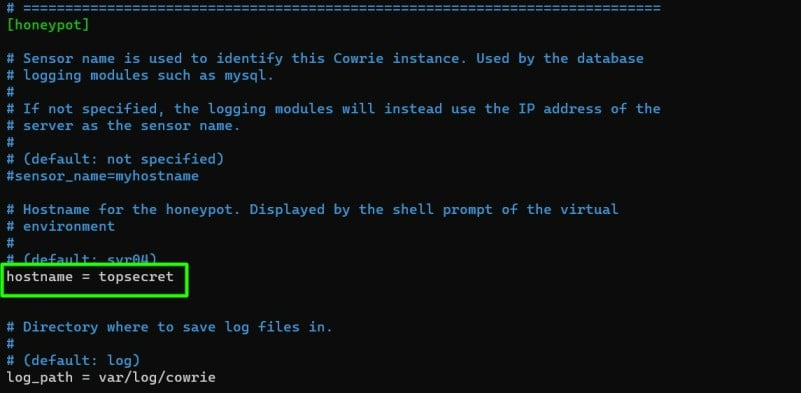
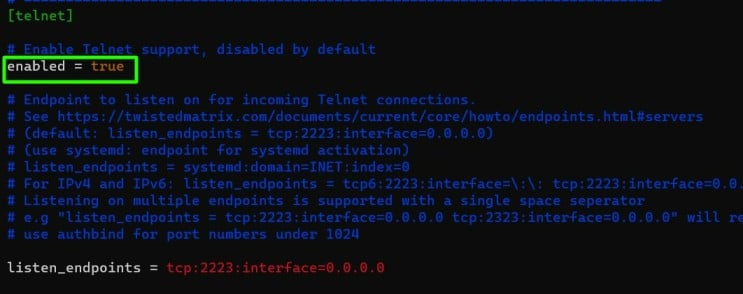
Step 10. Edit the config file by changing the hostname first and then enable telnet using any of the editors.
(cowrie-env) cowrie@localhost:~/cowrie/etc$ nano cowrie.cfg
Step 11. Redirect traffic of port 22 and 23 to the high ports 2222 and 2223 using iptables
root@localhost:~# iptables -t nat -A PREROUTING -p tcp --dport 22 -j REDIRECT --to-port 2222
root@localhost:~# iptables -t nat -A PREROUTING -p tcp --dport 23 -j REDIRECT --to-port 2223
Step 12. Start cowrie.
(cowrie-env) cowrie@localhost:~/cowrie$ bin/cowrie start
You can stop cowrie by running the following command
(cowrie-env) cowrie@localhost:~/cowrie$ bin/cowrie stop
Step 13. To see the logs in realtime in honeypot use below command.
(cowrie-env) cowrie@localhost:~/cowrie/var/log/cowrie$ tail -f cowrie.log
Step 14. To get the logs of Honeypot use below command
(cowrie-env) cowrie@localhost:~/cowrie/var/log/cowrie$ cat cowrie.log
Related Articles: