Auto-Discover and Import Servers with Managed SubSSH Users
How to configure Ezeelogin to automatically discover and import servers on a scheduled basis with automatic creation of managed SubSSH users?
Overview: This guide provides step-by-step instructions for configuring Ezeelogin to automatically discover and import servers on a scheduled basis. By specifying an IP range or CIDR block, Ezeelogin can identify available servers and automatically add them to the gateway. The discovery process is performed by an auto discovery script that runs at scheduled intervals using a cron job.
This feature is available starting from Ezeelogin version 7.47.0. Refer article to upgrade Ezeelogin to latest version.
Step 1: Enable API options from Ezeelogin GUI
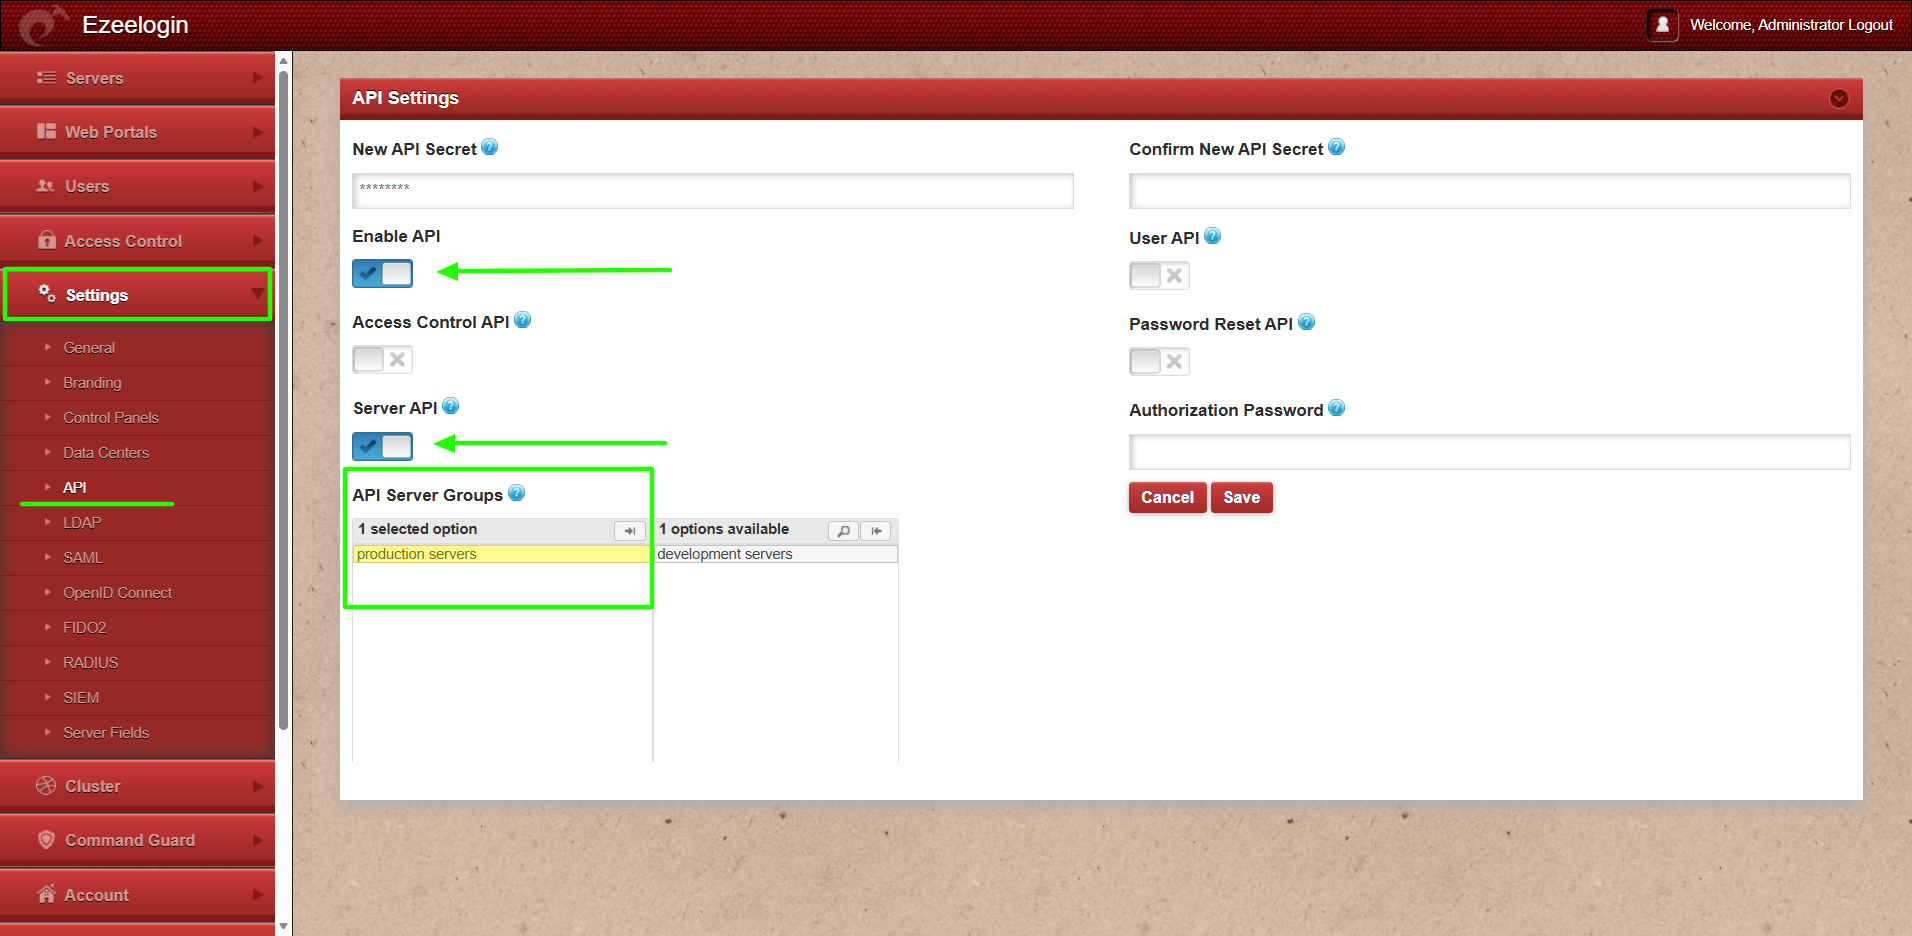
Navigate to the Servers tab and click API. Enable both the Enable API and Server API options. Refer below screenshot.
Step 2: Create a CSV file to import or manually add IP range/CIDR block in GUI
Method 1: Create an IP Range or CIDR Block manually. Provide a name for the entry, specify the IP range or CIDR block, and enter the SSH port, username, and password that will be used to connect to the servers within the specified range.
Note: All remote servers within the specified IP range or CIDR block must use the same SSH port, username, and password. Ezeelogin will use these credentials during the discovery process to connect to and add the relevant servers.
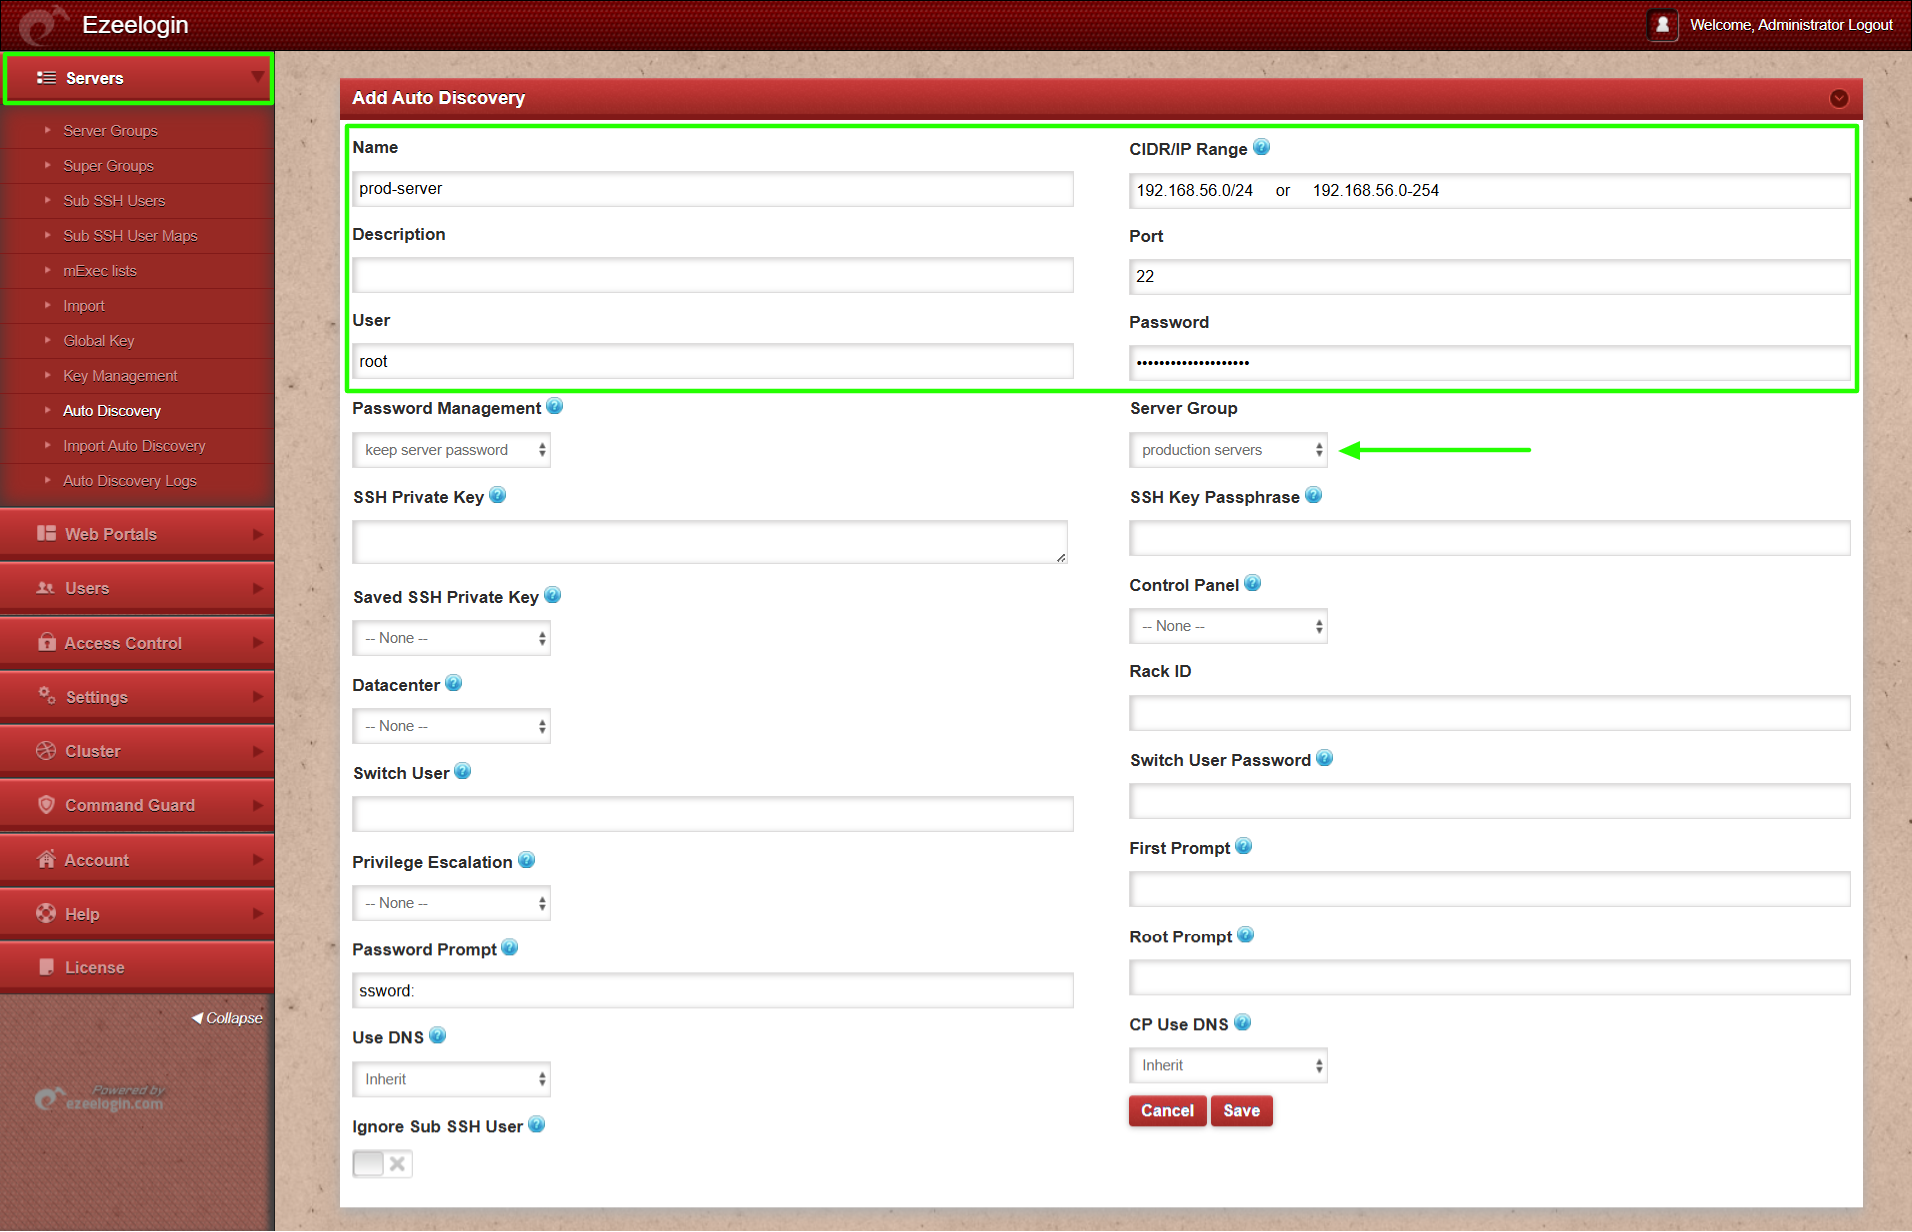
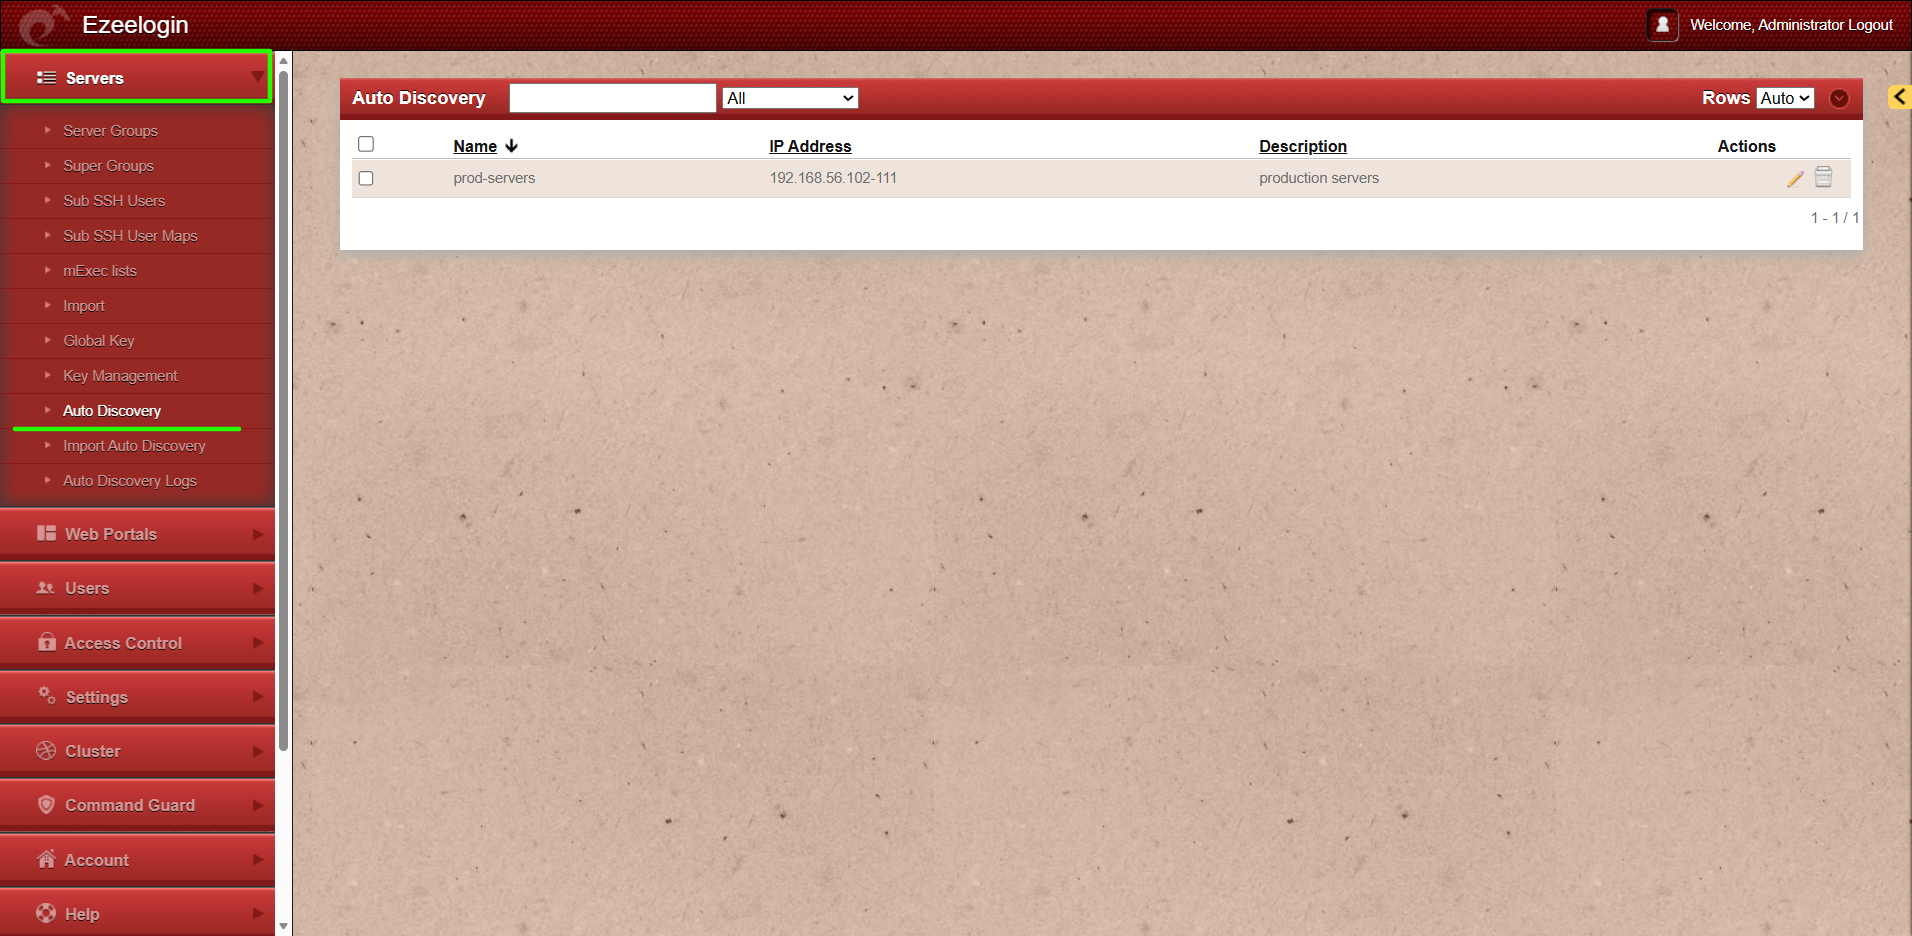
After the configuration is successfully saved, it will be displayed in the Auto Discovery tab.
Method 1.a: Create a CSV with below details:
| name | ips | description | port | user | password | keep_password | servergroup |
| prod_server_1 | 192.168.56.100 | prod_server_1 | 22 | root | password123 | S | production servers |
| prod_server_2 | 192.168.56.101 | prod_server_1 | 22 | root | password123 | S | production servers |
| prod_server_3 | 192.168.56.102 | prod_server_1 | 22 | root | password123 | S | production servers |
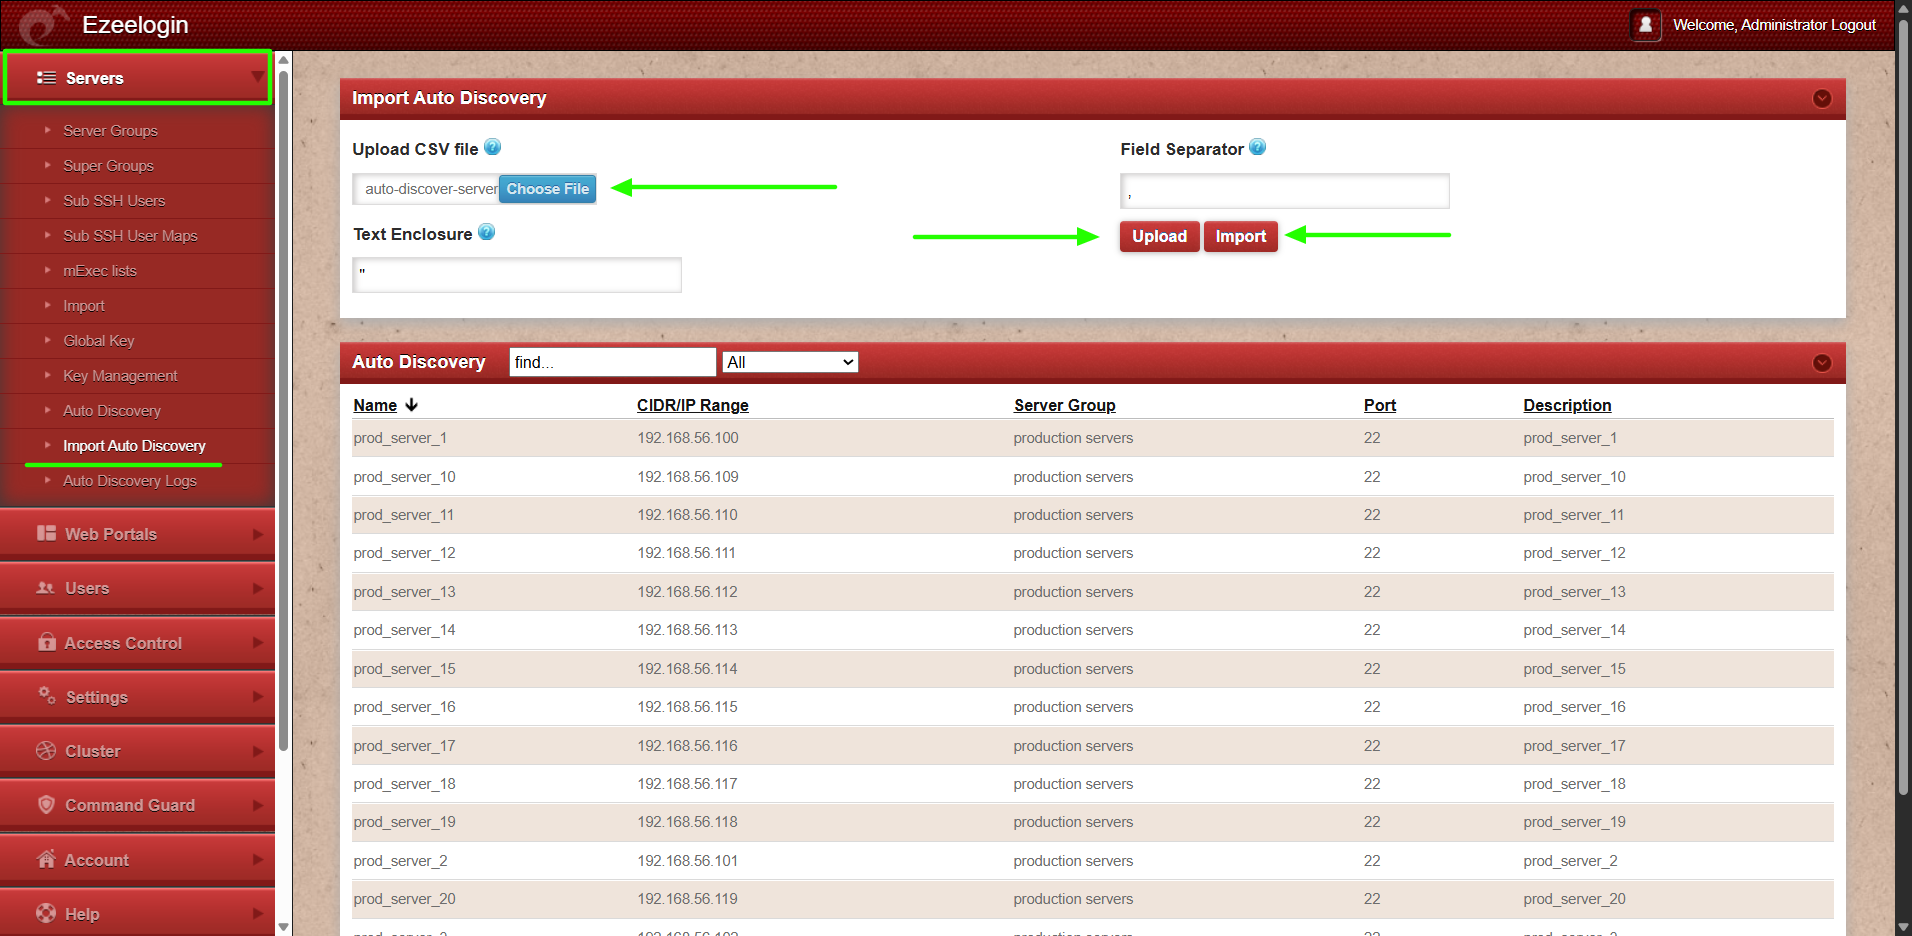
Method 1.b: Upload the CSV file through the GUI and import it to populate the Auto Discover tab with the listed servers. Note that this process only imports the server entries into the Auto-Discover tab and does not create valid servers in Ezeelogin.
Step 3: Configure a Cron Job to Run the Auto Discovery Script on a Scheduled Basis
To automate server discovery, configure a cron job to run the auto discovery script at regular intervals based on the requirements (daily, weekly, or monthly).
Add one of the following entries:
Daily (at 1:00 AM every day):
0 1 * * * php /usr/local/ezlogin/auto_discovery.php
Weekly (at 1:00 AM every Sunday):
0 1 * * 0 php /usr/local/ezlogin/auto_discovery.php
Monthly (at 1:00 AM on the first day of every month) :
0 1 1 * * php /usr/local/ezlogin/auto_discovery.php
After saving the crontab, verify that the entry has been added successfully:
root@gateway:~# crontab -l
The configured cron job will automatically execute the auto discovery script at the scheduled time, allowing Ezeelogin to discover and import eligible servers from the configured IP ranges or CIDR blocks without manual intervention.
Step 4: How to run the script manually and auto-import available servers?
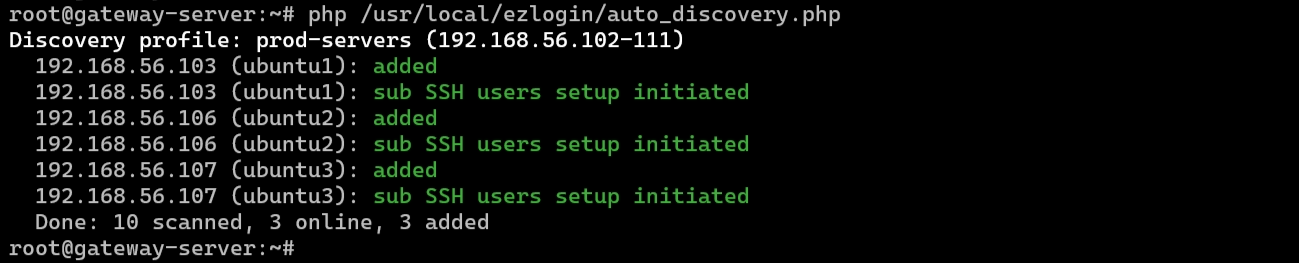
In this example, Ezeelogin will attempt to connect via SSH to all servers within the IP range 192.168.56.102 to 192.168.56.111. If Ezeelogin successfully establishes an SSH connection to a server, the server will be automatically added to Ezeelogin. Servers that cannot be reached or authenticated via SSH will not be added. Once a server has been successfully added, Ezeelogin will automatically create all managed SubSSH users on the newly added server.
Run the below command on gateway server:
root@gateway:~# php /usr/local/ezlogin/auto_discovery.php
Step 5: How to view the added servers?
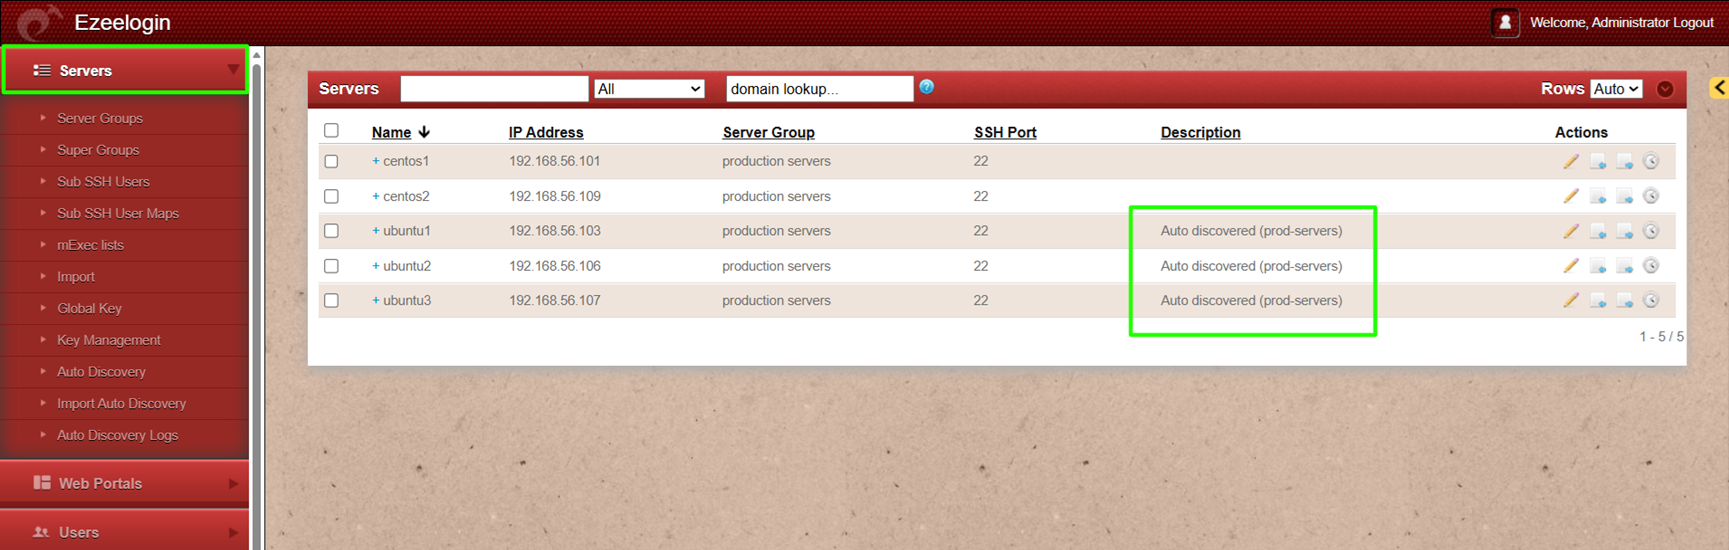
Navigate to the Servers tab and refresh the browser. Auto discovered servers will be listed along with the description configured for the auto discovery profile.
Step 6: How to view the logs of auto discovery?
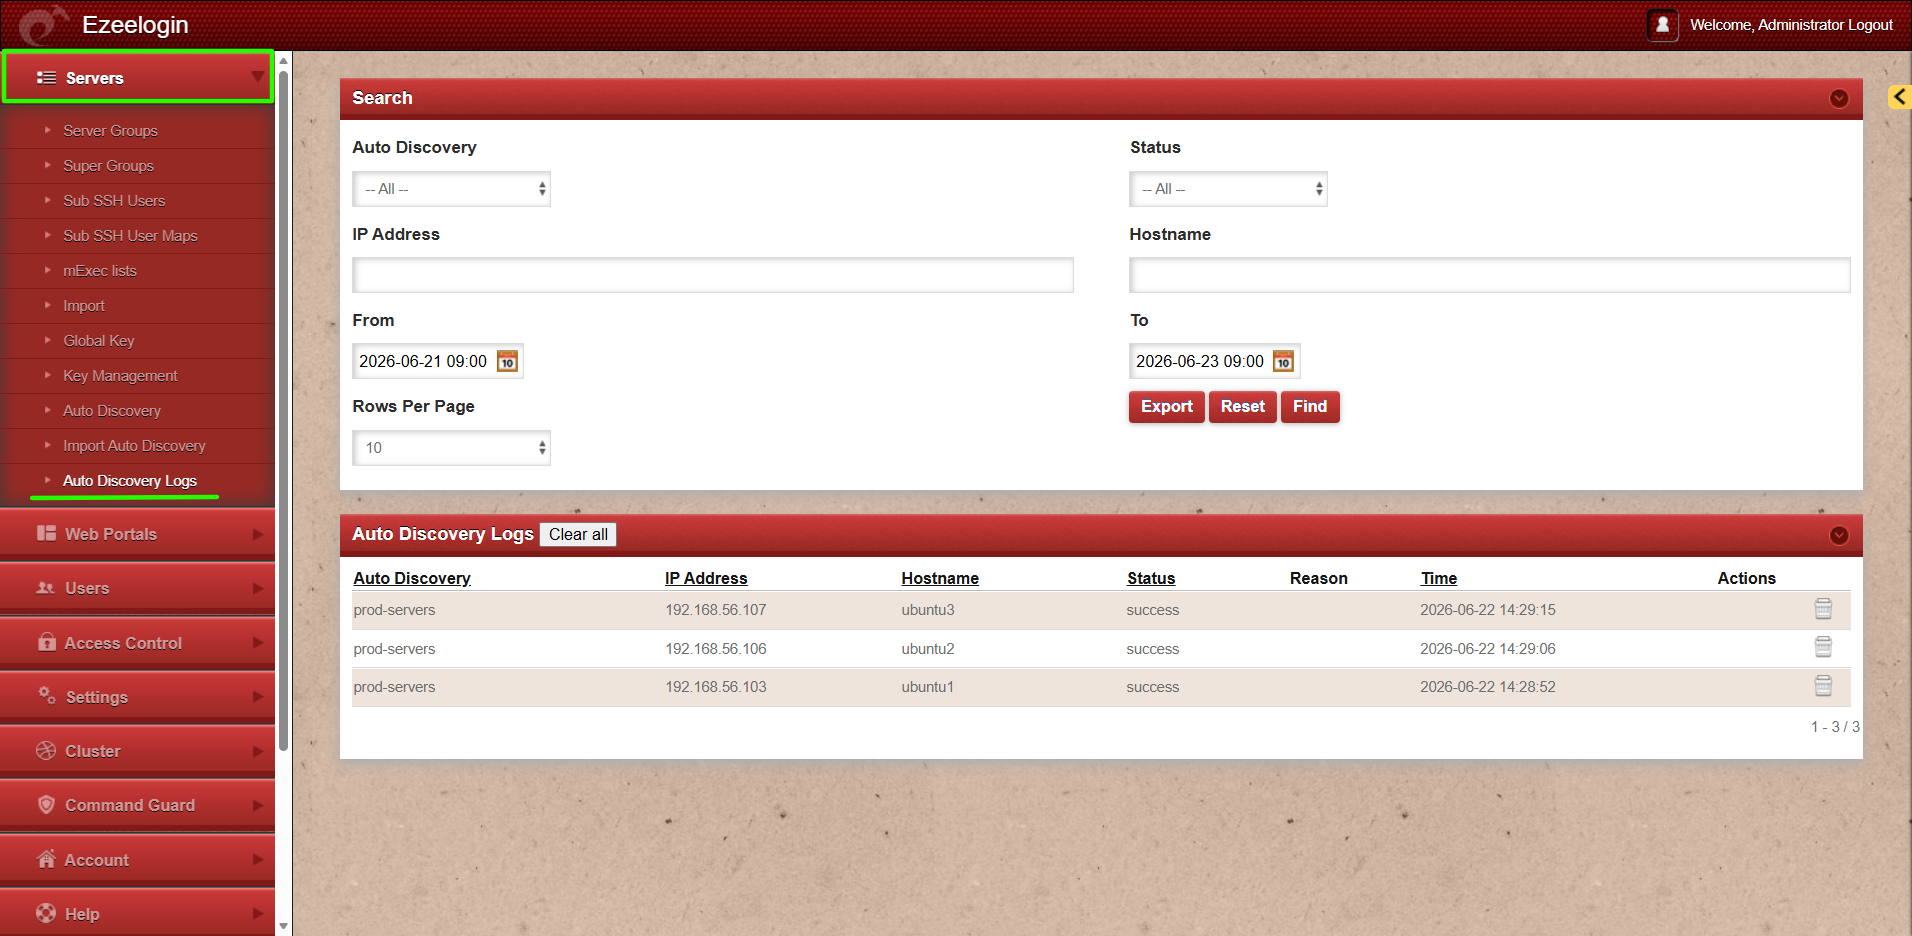
Navigate to the Servers tab, select Auto Discovery Logs, and click Find to view the log entries for servers that were added through the auto discovery process.
Common Questions and Errors During Auto Discovery
Q1. Why is the scanned count different from the total count of servers in the CSV file or the IP range/CIDR block?

Answer: The scanned count may differ from the total number of IP addresses in the CSV file or IP range/CIDR block because it only includes servers that Ezeelogin actually attempts to scan. IP addresses that already exist in Ezeelogin are skipped during the scan. and therefore are not included in the scanned count. As a result, the scanned count reflects only the new or unregistered servers that are evaluated during the auto discovery process, not the total number of IP addresses in the specified range.
Error 1: add_server failed [{"name":"The server exists"}]
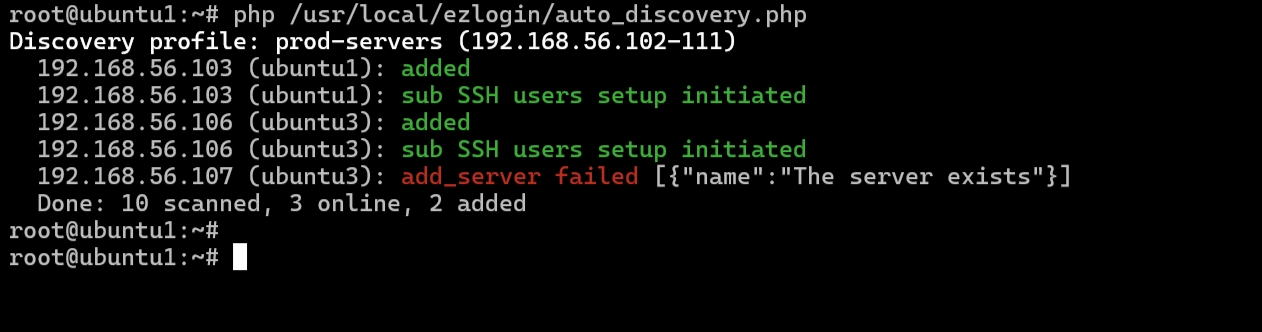
Answer: This is because another server has already been added to Ezeelogin with the same hostname. In this example, the hostname **ubuntu3** is already associated with a different IP address in Ezeelogin, preventing the newly discovered server from being added with the same hostname.
Related Articles:
Import servers from a CSV file into Ezeelogin
Add a Linux server or a Linux instance into the Ezeelogin ssh jumphost?
User identity and access management in SSH
How to add a subssh user with non privileged remote ssh login user