How to import servers without password authentication ?
Import servers from CSV and automatically set the password
Overview: The article explains how to import servers into Ezeelogin without password authentication using either the Global SSH Key or a Custom Key via a CSV file.
1. Import servers from Gateway server without password authentication.
Step 1: Add the Ezeelogin global key to the authorized_keys file on all remote servers.
Step 1(A): Login to Gateway server's webpanel -> copy the Global key. Refer to below screenshot.
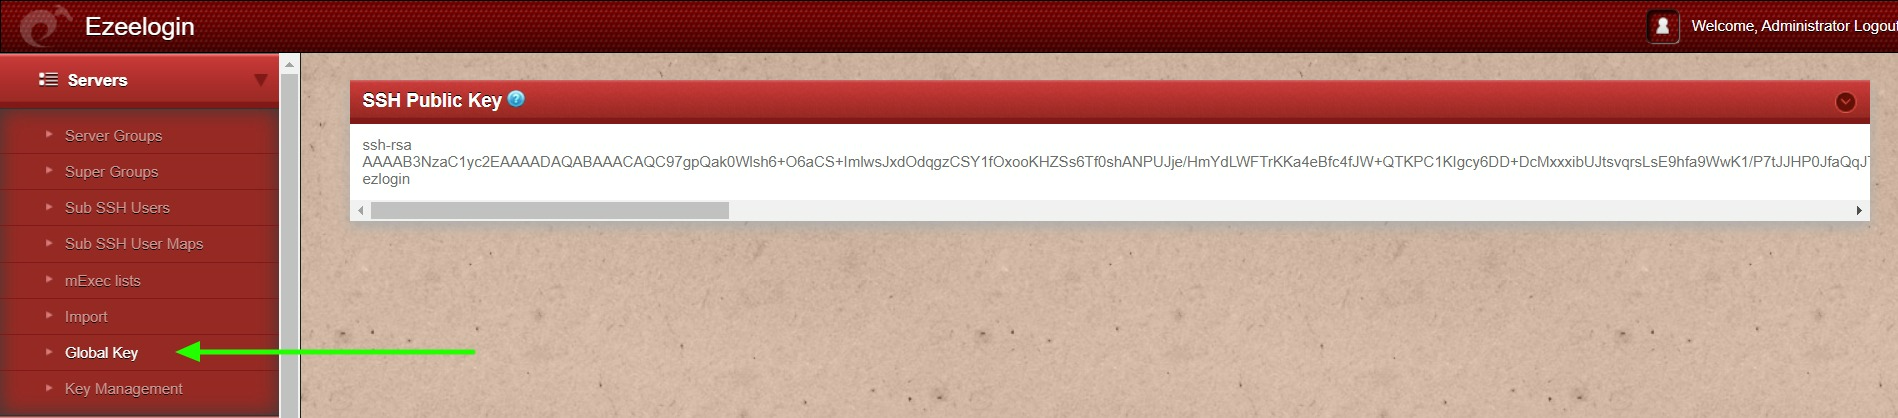
Copy the Ezeelogin global ssh public key and paste it into the authorized_key file in the remote servers.
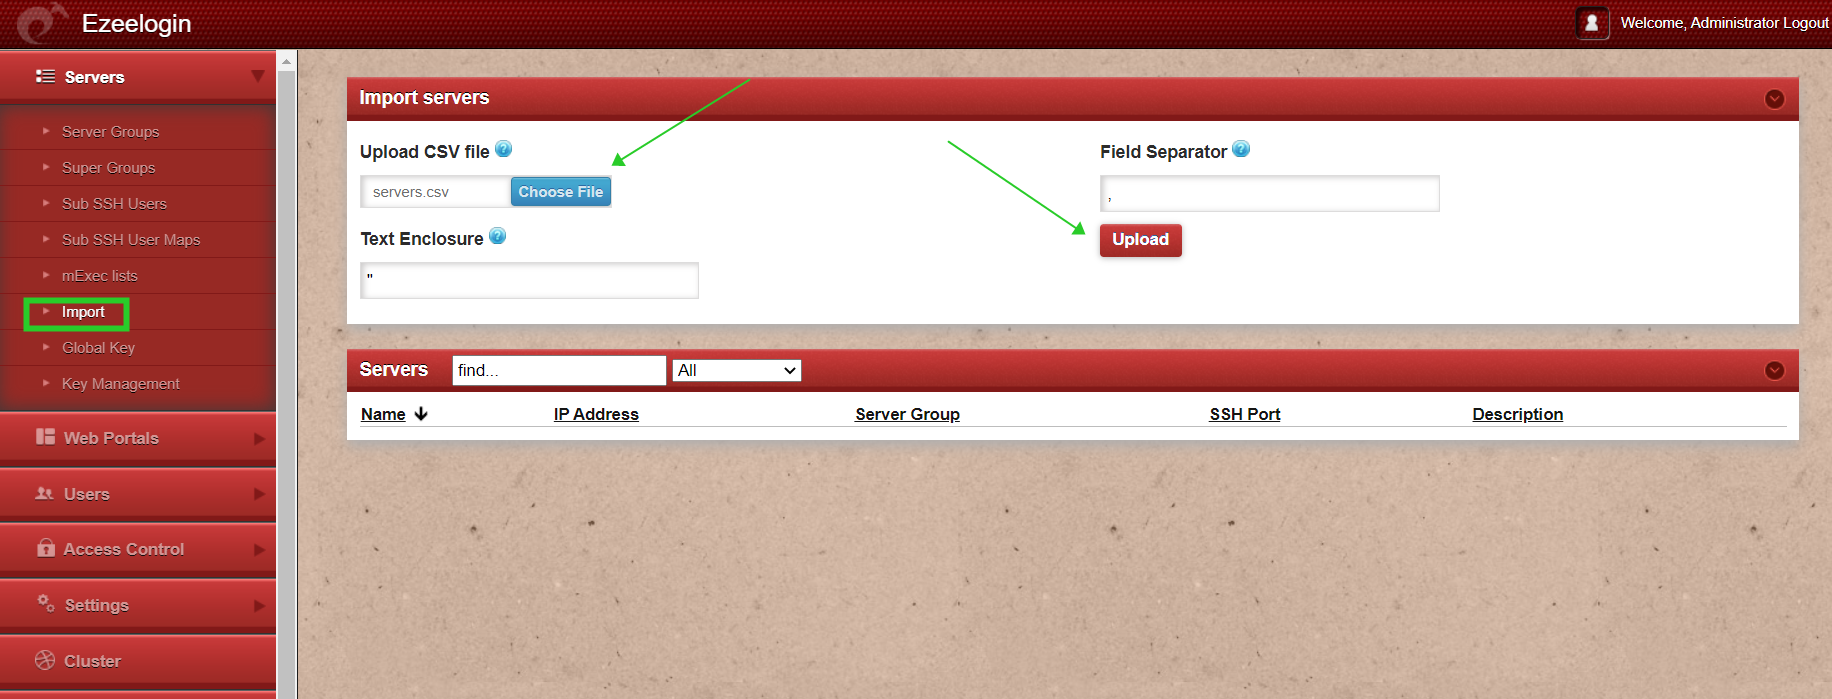
Step 2: To import servers from CSV,
Step 2(A): Use the export feature to get a CSV file file as shown below which can be later used as a template to import more servers.
"name"|"ip_address"|"group"|"password"|"ssh_port"|"ssh_user"|"keep_password"|"enable_ssh"|"controlpanel"|"datacenter"|"description"|"tunnel_host"|"switch_user"|"switch_pass"|"switch_sudo"|"prompt1"|"prompt2"|"prompt3"|"cp_user"|"cp_pass"|"rc_host"|"rc_user"|"rc_pass"|"onhost"|"ishn"|"rack_id"|"machine_id"|"comments"|"use_dns"|"passphrase"|"ssh_key"|"rdp"|"windows_domain"|"ipmi_host"|"ipmi_protocol"|"ipmi_port"|"ipmi_request_method"|"ipmi_user_field"|"ipmi_username"|"ipmi_passwd_field"|"ipmi_password"|"ipmi_basic_auth"|"ipmi_request_uri"|"ipmi_extra_vars"|"ipmi_enable"
"ez.noc.com"|"118.7.63.62"|"LINUX"|""|"22"|"root"|"S"|"Y"|""|""|"TestMachine"|""|""|""|"N"|""|"Password:"|""|""|"
Step 2(B):.Open the sample CSV file and edit and update name.ip_address, group, password,ssh_port,ssh_user,keep_password, and enable_ssh as below.
Give a random string as a password and set keep_password as 'N' for all servers.
For example,
You can set the same password(random string) for all servers.
+------------------------------------------------------------------------------------------------+
| name | ip_address | group | password | ssh_port | ssh_user | keep_password | enable_ssh |
+------------------------------------------------------------------------------------------------+
| ez.noc.com | 118.7.63.62 | Linux | Ezee123 | 22 | | N | Y |
+------------------------------------------------------------------------------------------------+
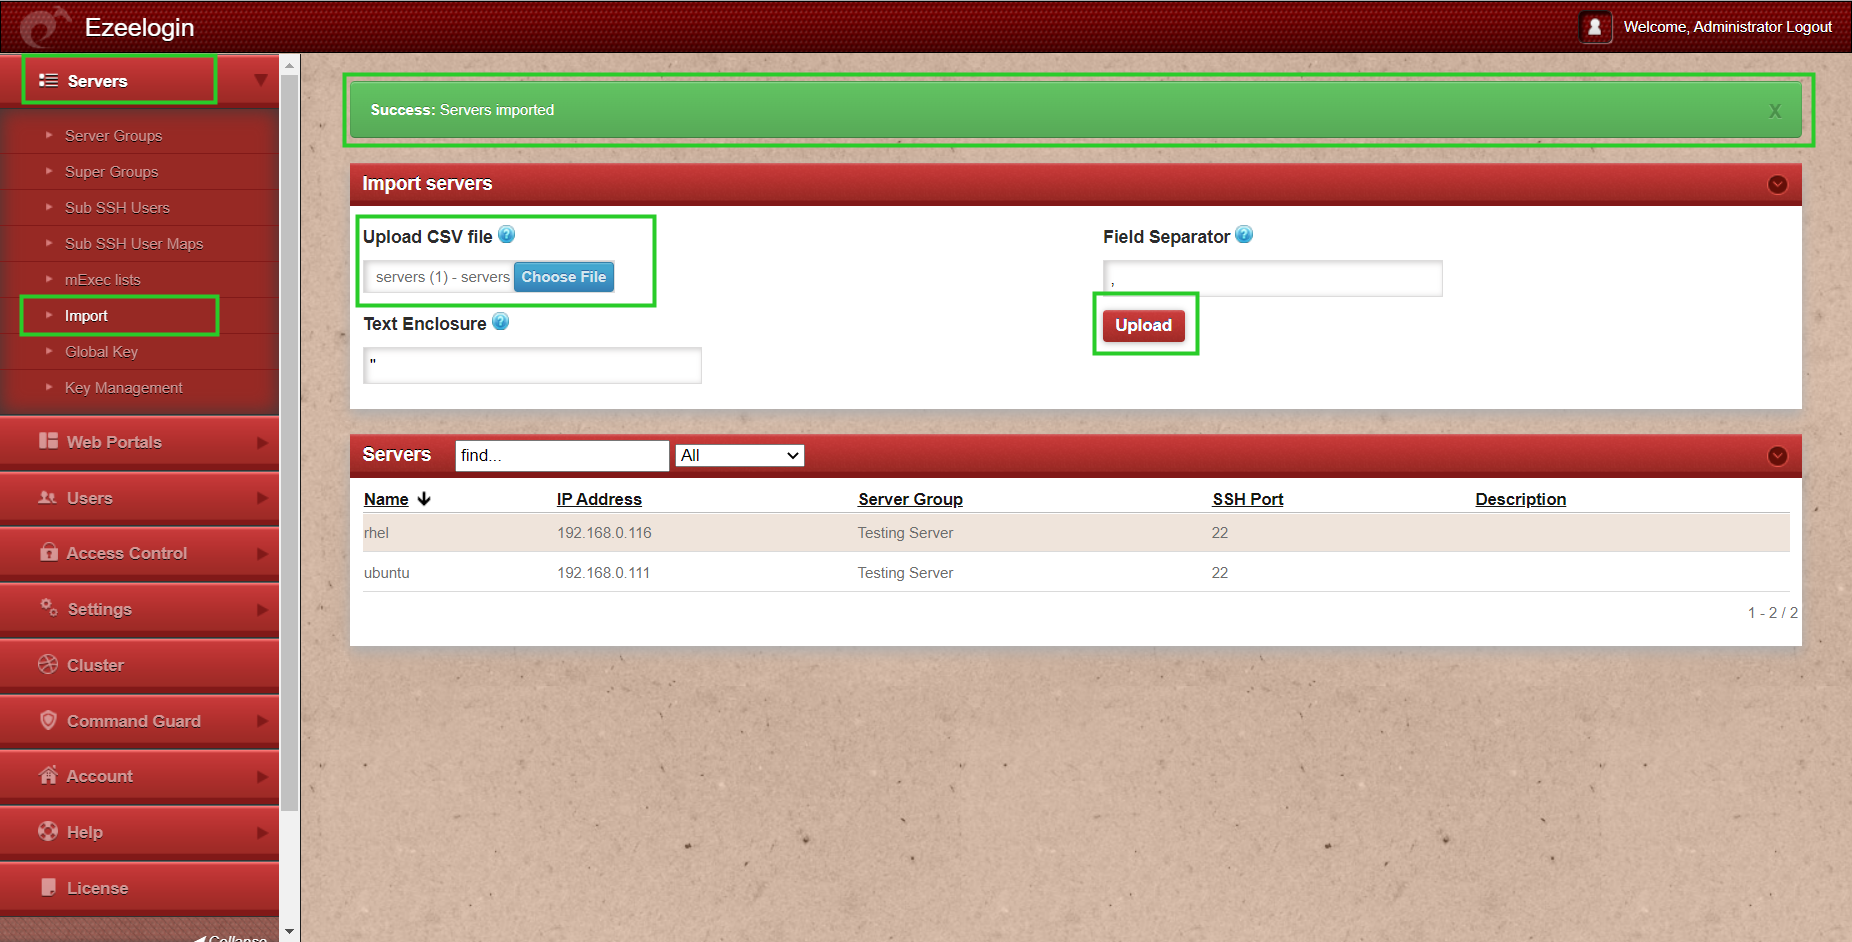
Step 2(C):. Import the servers from the CSV file. Login to gateway GUI > click on the import tab on the left then choose the CSV file and click upload.
Make sure that you have created the server groups mentioned on the CSV before import.
Step 2(D): Once you click upload, the CSV file would be parsed and if the format is correct, then the import button would show up so that you can import the list of servers. Using this feature you can import multiple servers quickly.
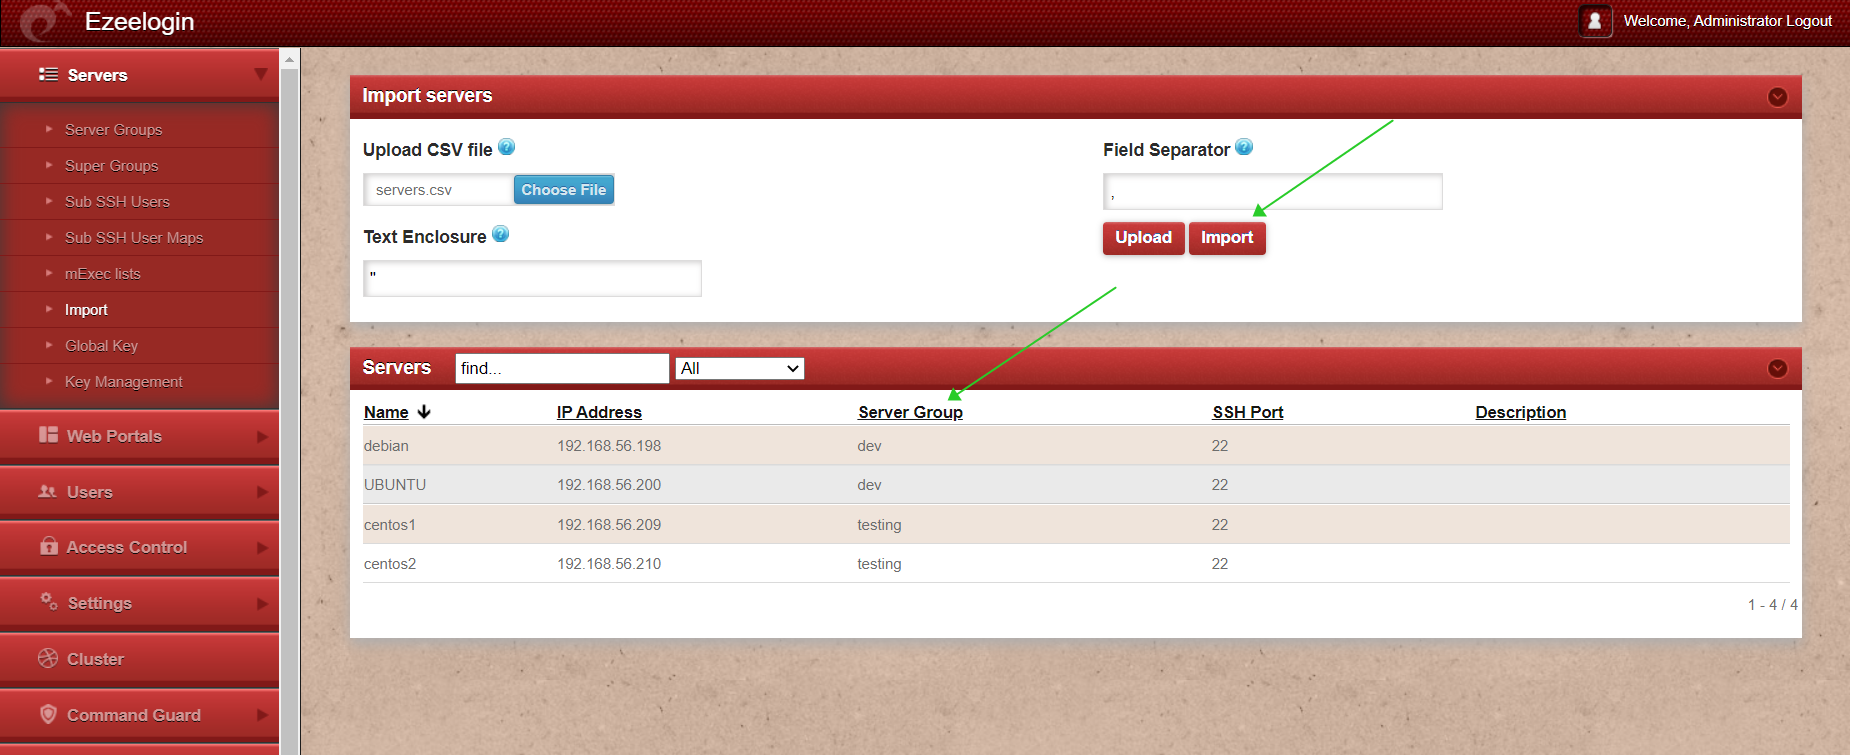
Step(E): After the successful import of the servers, it will display the message "Success: Servers imported" as shown in the screenshot below.

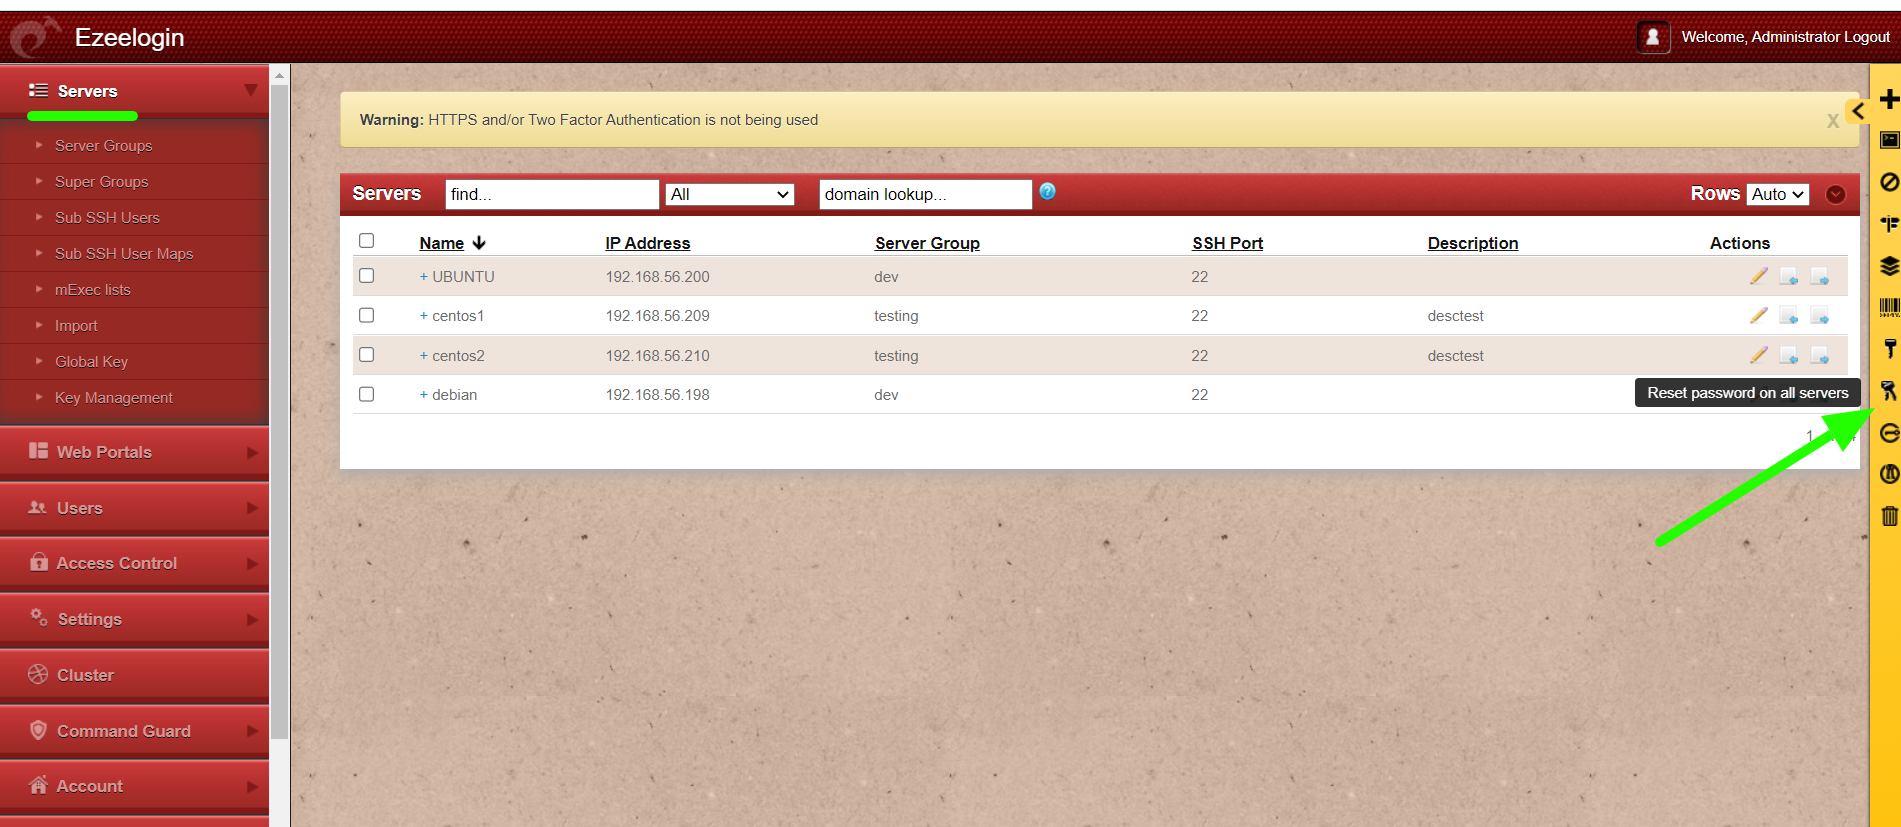
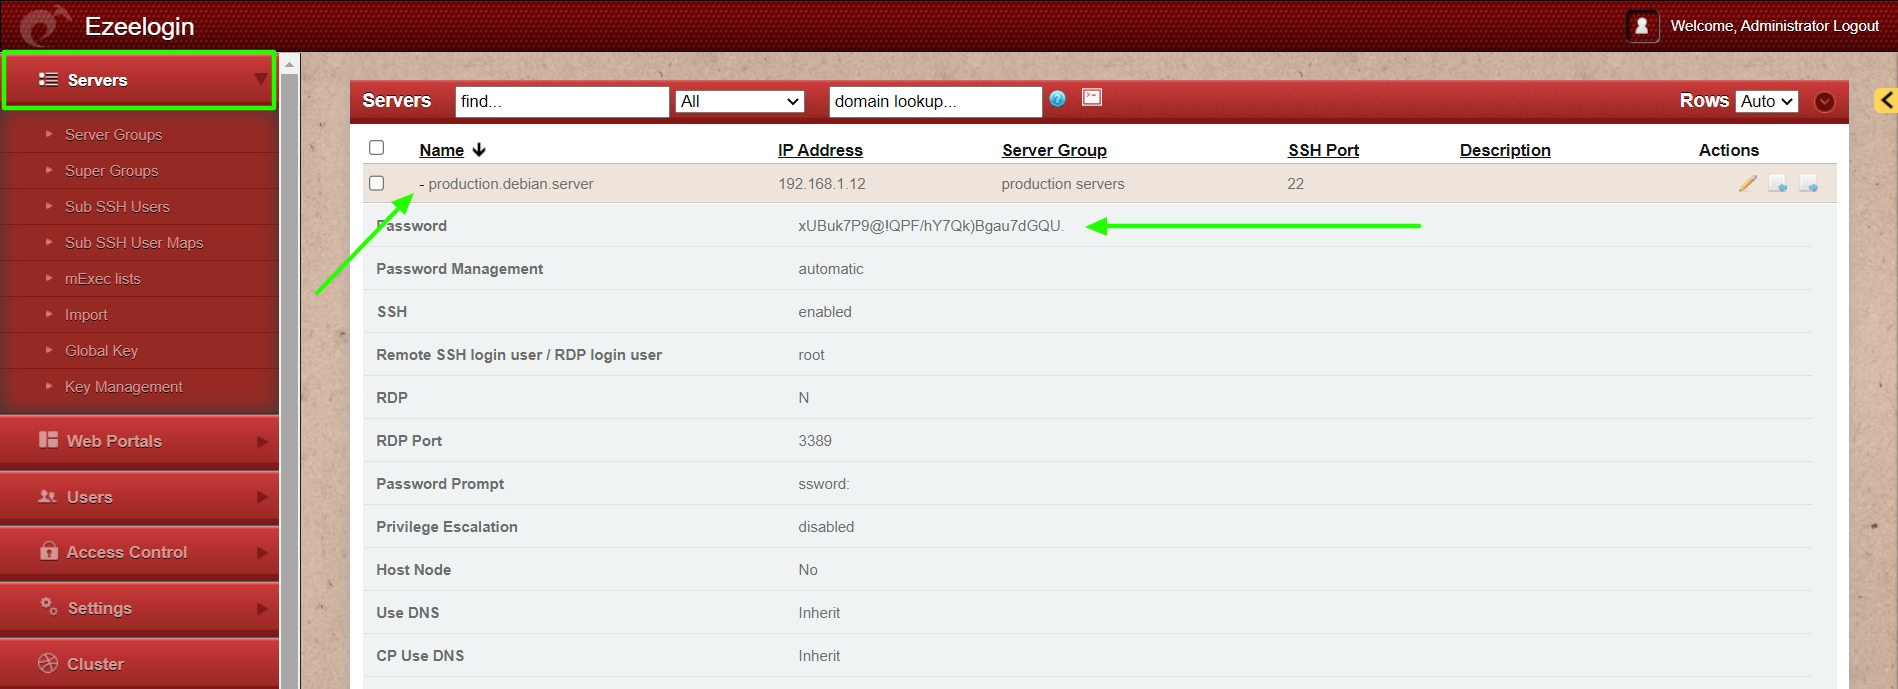
Step 3: Reset the password on all servers from the servers tab as follows.
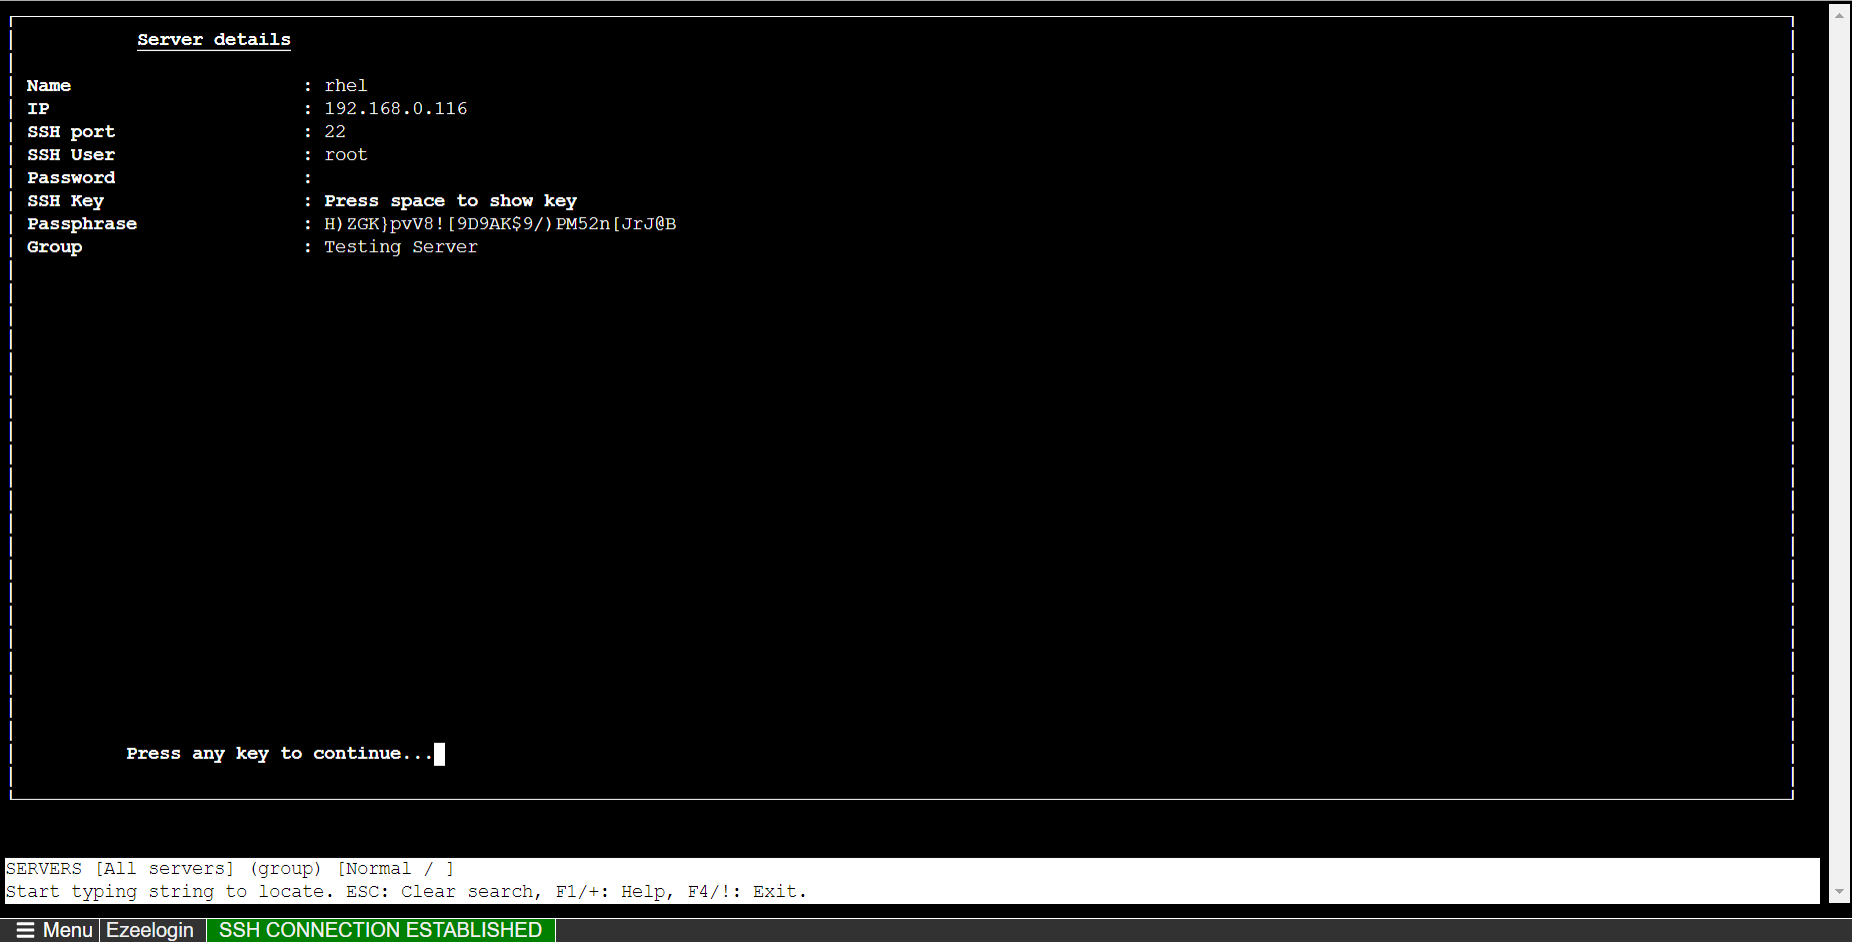
Step 4: You can view the password by : Login to gateway GUI > Servers > + icon to view the server details.
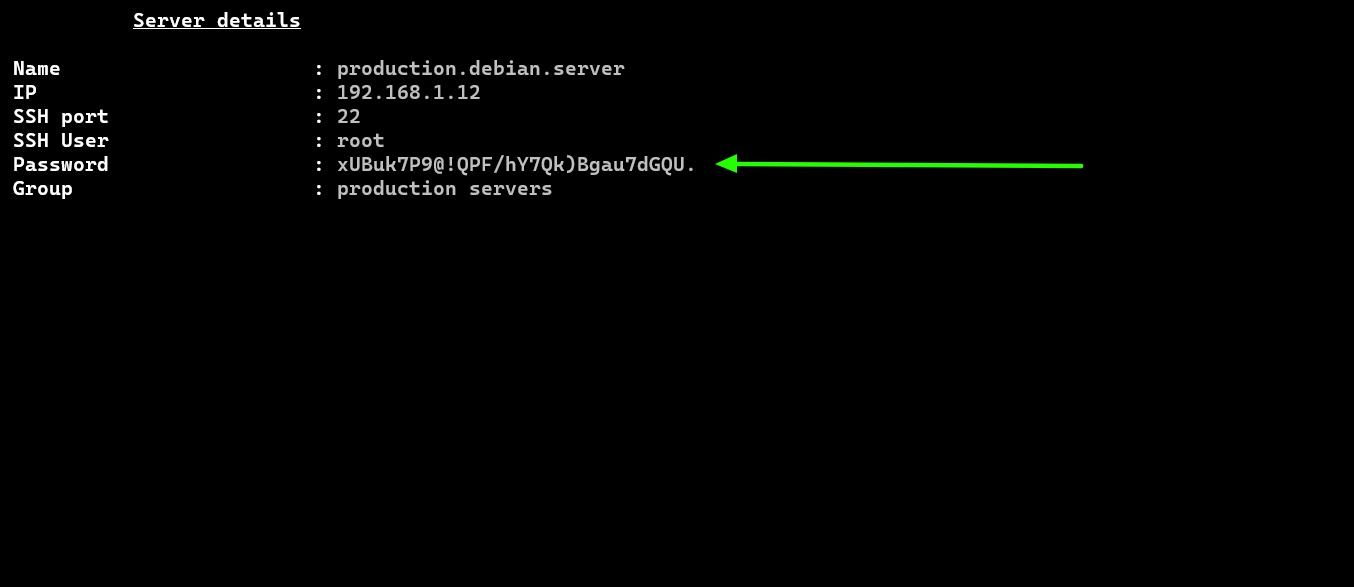
Login to Ezeelogin shell (ezsh) -> navigate to any server using the up and down arrow keys -> click on the Tab button to view server details.
Step 5: Refer to the article to reset the password of the servers periodically.
2. Import Server from CSV with Custom Key
Follow the steps to import servers from CSV with custom key.
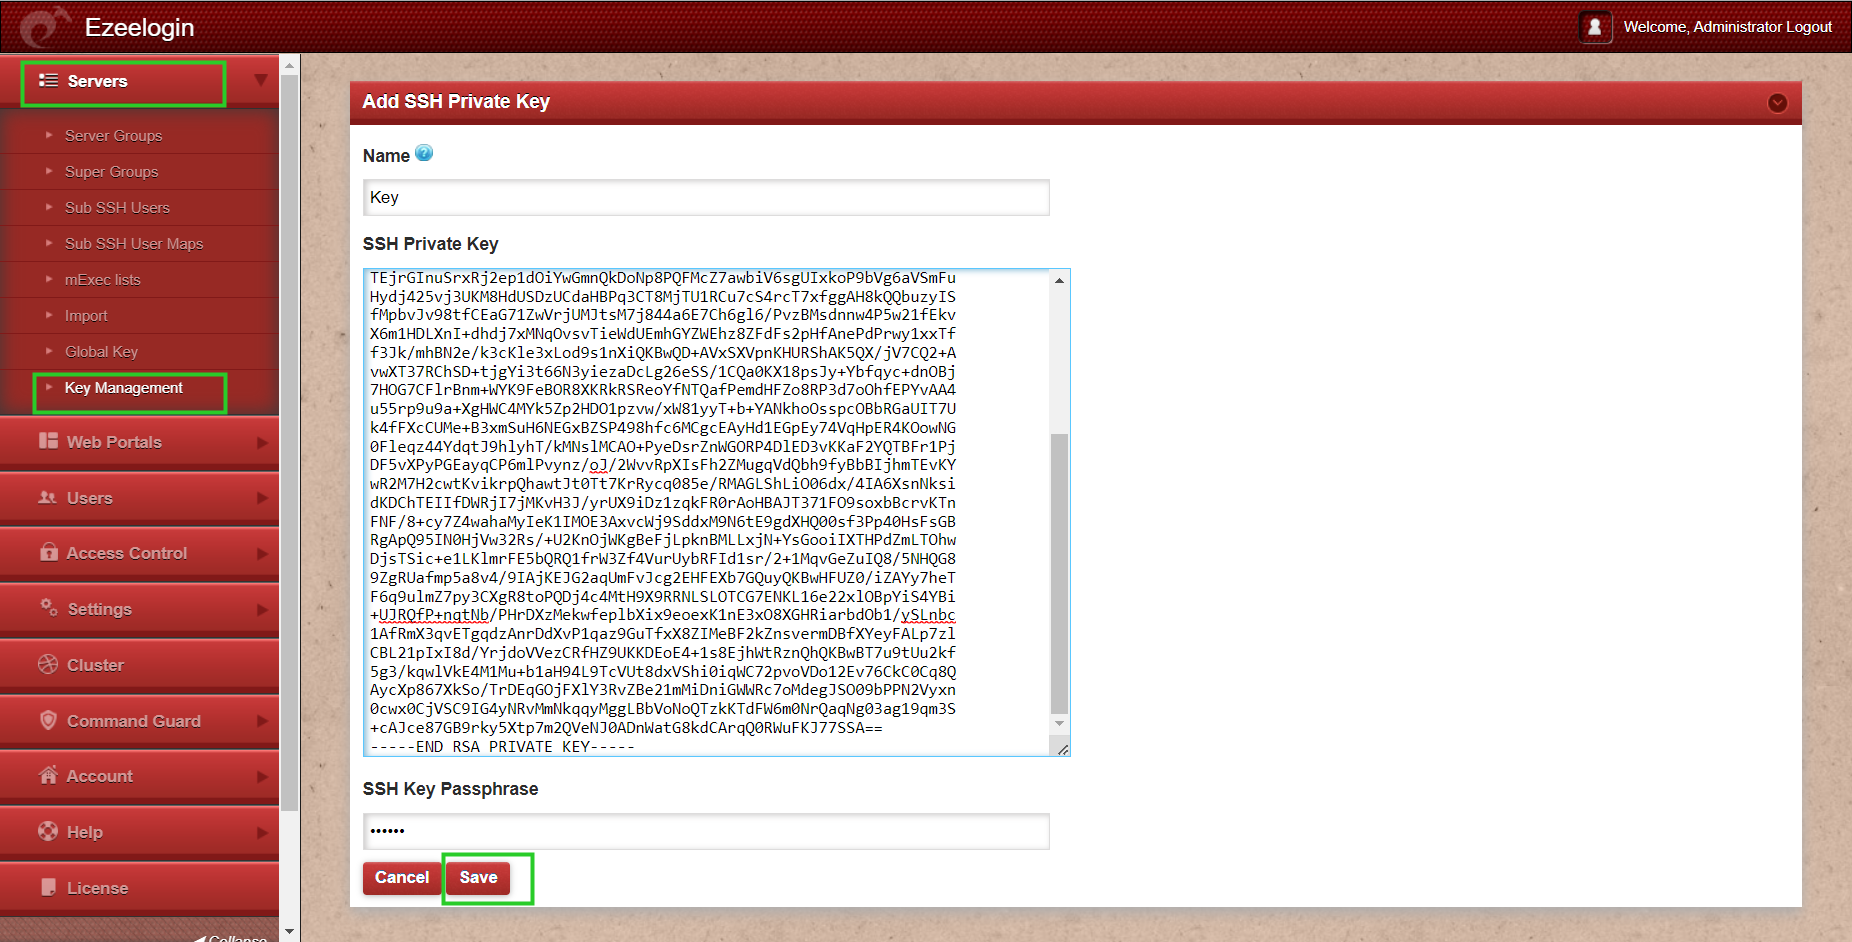
Step 1: Add the Custom key in Key management from Servers tab >> Key Management and add Private keys with passphrases.
( On adding the custom private keys in Key management , we can later select the private key while adding a server.)
Step 2: Export and Import the servers.
Use the Export feature and export the servers to get a CSV file as shown below.
"name","ip_address","group","password","ssh_port","rdp_port","ssh_user","keep_password","enable_ssh","controlpanel","datacenter","description","tunnel_host","switch_user","switch_pass","switch_sudo","prompt1","prompt2","prompt3","cp_user","cp_pass","rc_host","rc_user","rc_pass","onhost","ishn","rack_id","machine_id","comments","use_dns","passphrase","ssh_key","ssh_private_key","rdp","windows_domain","ipmi_host","ipmi_protocol","ipmi_port","ipmi_request_method","ipmi_user_field","ipmi_username","ipmi_passwd_field","ipmi_password","ipmi_basic_auth","ipmi_request_uri","ipmi_extra_vars","ipmi_enable","mysql","Testing"
"rhel","192.168.0.116","Testing Server","","22","3389","root","S","Y","","","","","","","N","","ssword:","","","","","","","","N","","","","N","","","","N","","","http","80","POST","","","","","N","","","N",,
"ubuntu","192.168.0.111","Testing Server","","22","3389","root","S","Y","","","","","","","N","","ssword:","","","","","","","","N","","","","N","","","","N","","","http","80","POST","","","","","N","","","N",,
Open the CSV exported file and edit the ssh_key as the key for all servers as shown below.
Make sure to mention the name of the Key management name that you had mentioned while creating the custom key in step 1.
+------------------------------------------------------------------------+
| name | ip_address | group | ssh_port |ssh private_key |
+------------------------------------------------------------------------+
| rhel | 192.168.0.116 | Testing Linux | 22 | key |
+------------------------------------------------------------------------+
| ubuntu | 192.168.0.111 | Testing Linux | 22 | key |
+------------------------------------------------------------------------+
Step 3: Import this csv file from gateway GUI. Under Servers >> Import >> Select the CSV file and Upload >> Import.
Step 4: Login to Ezlogin GUI >> Ezsh shell >> Navigate to any server and click an tab Key to confirm the way of login.
Related Articles: