setup web ssh console in ezeelogin and ssh via browser
How to set up the WebSSH console and SSH via browser?
Overview: This article explains the process of setting up and using the WebSSH console in Ezeelogin, which allows users to securely SSH into servers directly from a web browser without needing a dedicated SSH terminal. It covers the configuration of Node.js, SSL certificates, SSH port settings,and managing user permissions for optimal functionality.
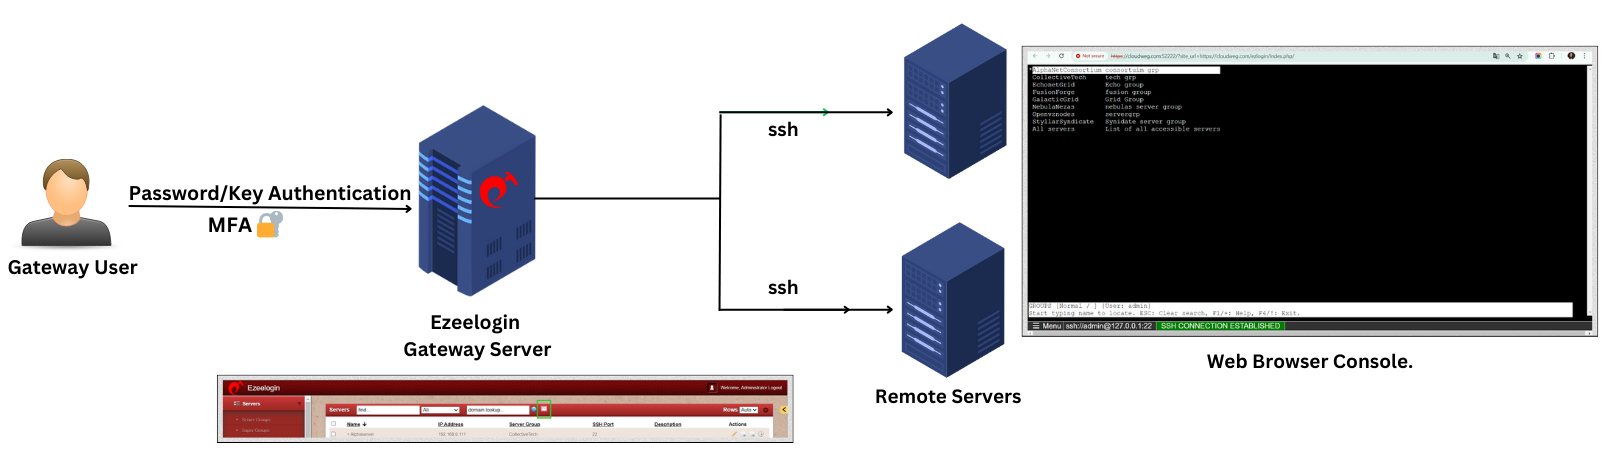
The WebSSH Console feature in Ezeelogin allows users to securely SSH into servers directly from a web browser without needing a dedicated SSH terminal. Here’s a comprehensive guide to setting up and utilizing this feature:
You can always use SSH clients like Putty in Windows, Terminal in MAC, Konsole, Xterm, etc in Linux, and SSH to the gateway to login.
root@desktop:$ ssh -p <portnumber> <admin_user>@<gateway-ip>
Web Shell will work only if the web interface is accessed via HTTPS and uses 2FA to log in. Refer to Enforce 2FA or Enable 2FA and install SSL Certificates and Enforce Https.
1. White list your IP address from which you are accessing, as certain firewall programs may detect the traffic to the port (52222) ( set it up as shown below in the article ) as an anomaly and block your IP, thus blocking your access to the SSH gateway.
2. If upgrading from Ezeelogin versions below 7.4.0, reset the gateway user’s password within the GUI to avoid encountering a blank screen issue on accessing the webSSH console.
1. Install the NODE JS Application on the Jumphost server.
Step 1(A): On Centos 7
root@gateway:~# yum install epel-release
root@gateway:~# yum install npm
Step 1(B): On Ubuntu 16/18 and Debian 10
root@gateway:~# apt install npm
Step 1(C): On Ubuntu 20/22
root@gateway:~# apt-get update
root@gateway:~# apt install npm
2. Install n, Node’s version manager
Step 2(A): If you are not using SSL, you need to set the repo to HTTP by running :
root@gateway:~# npm config set registry http://registry.npmjs.org/
root@gateway:~# npm install -g n
3. Install node
Step 3(A): To install the latest version:
root@gateway:~# n latest
Step 3(B): To install the corresponding version :
root@gateway:~# n version.number
For example, the below command will install node 19
root@gateway:~#~ n 19
Step 3(C): Run the following command to install the node without SSL
root@gateway:~# n --insecure latest
Step 3(D): To switch between node versions run the following command and refer to the given screenshot.
root@gateway:~# n

4. Install NodeJS module dependencies
Step 4(A): Install the NodeJS module dependencies for the WebSSH Console Application.
root@gateway:~# php /usr/local/ezlogin/eztool.php -- -install_node_modules -node_component webssh
OR
root@gateway:~# cd $(awk '/^system_folder/ {print $2}' /usr/local/etc/ezlogin/ez.conf)/application/external/webssh/&& npm install
5. Update Settings
Step 5(A): The nodejs command field should have the path to the node or nodejs binary which usually is /usr/bin/node in the case of Centos7 and /usr/bin/nodejs in the case of Ubuntu 14-04. Run below commands to get the path to the node binary.
root@gateway:~# which node or which nodejs or whereis nodejs or whereis node
Step 5(B): Specify the path to the node binary correctly under Settings -> General -> Miscellaneous -> Nodejs Command and the Web SSH Port variable is configurable. Ensure that the port entered here is open for inbound traffic as well.
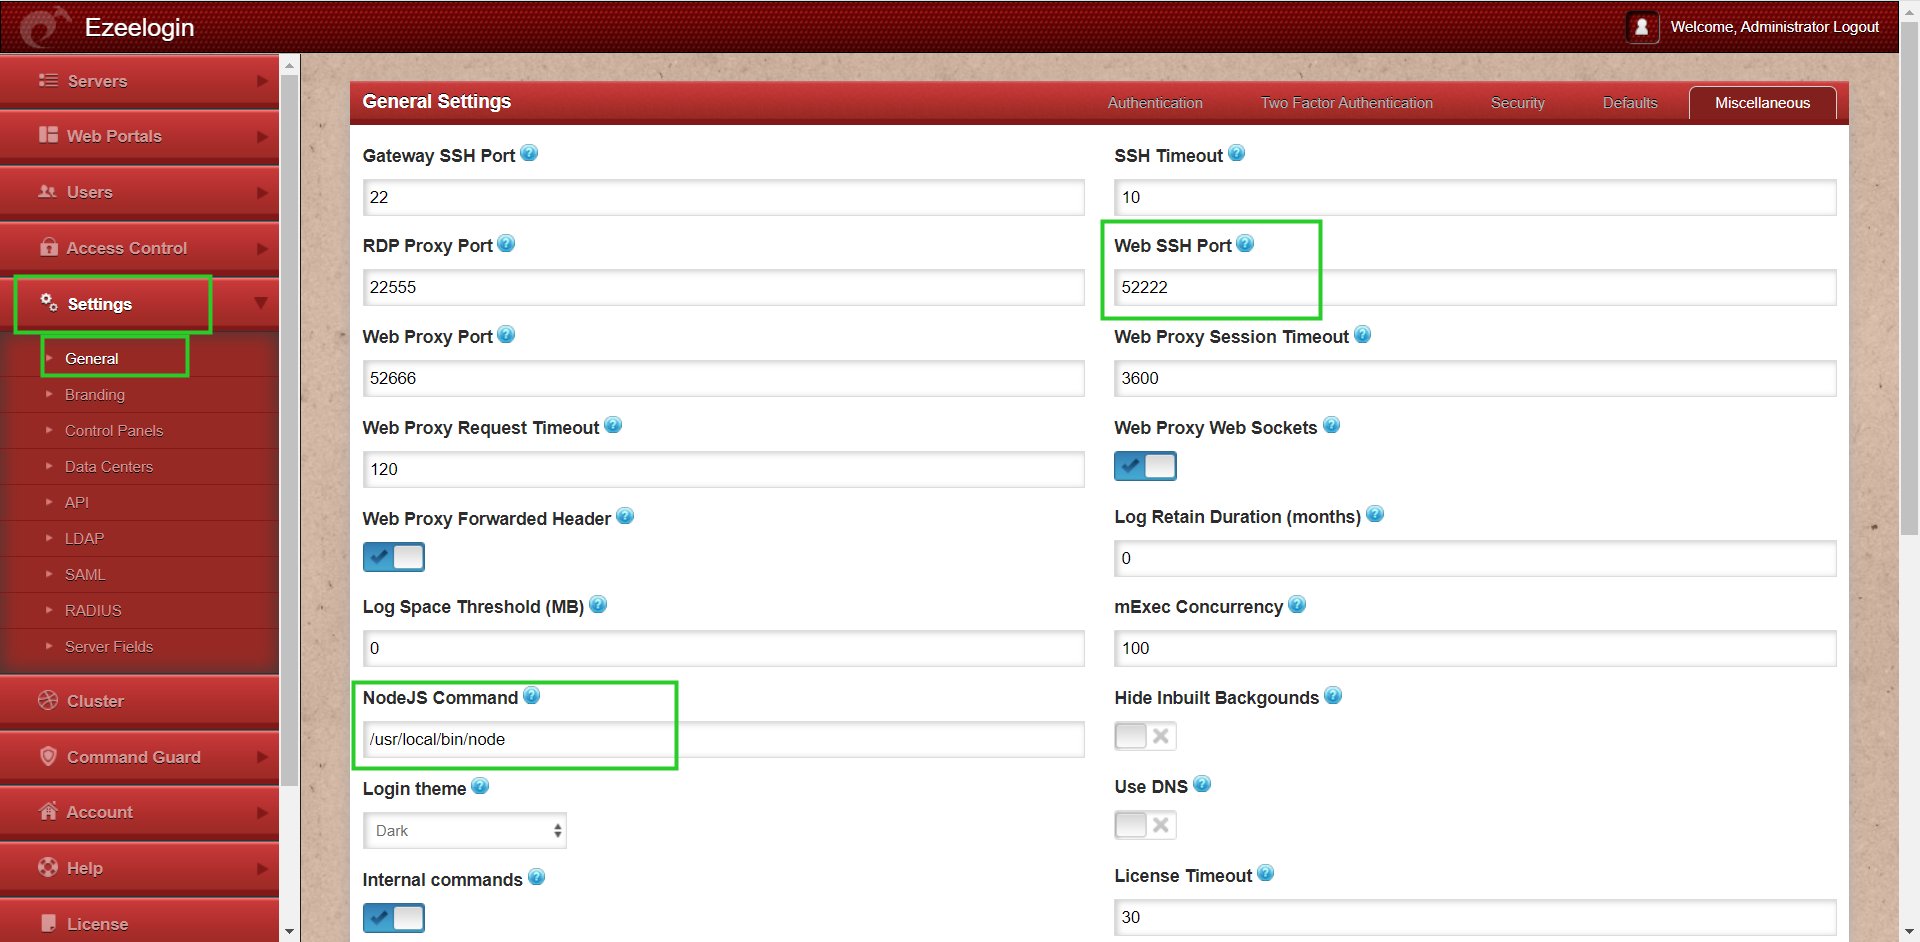
Ensure that inbound TCP traffic on port 52222 is open as nodejs server listens on this port.
6. SSL for the browser.
Step 6(A): Install the Certificates for the Web SSH Console to work. Generate a self-signed cert with the following command. Web Shell will work only if the web interface is accessed via HTTPS
root@gateway:~# openssl req -new -days 365 -x509 -nodes -newkey rsa:2048 -out /usr/local/etc/ezlogin/tls_cert.pem -keyout /usr/local/etc/ezlogin/tls_key.pem
Make sure to install SSL (self-signed or a valid cert )even if you have installed an SSL certificate on the Load balancer (ELB/ALB).
Also, make sure to add a listener and routing for the port RDP Proxy Port 22555
Step 6(B): Or put a valid ca, cert, and key in the files: /usr/local/etc/ezlogin/tls_ca.pem, /usr/local/etc/ezlogin/tls_cert.pem & /usr/local/etc/ezlogin/tls_key.pem respectively. You can rename your current .crt / .key file to .pem file.
Restart the node process after replacing the certificates. Run the command " pkill -9 node" to stop the node process and it will be restarted by clicking the "Open Web SSH console" icon in the servers tab in GUI.
You can use the OpenSSL s_client commands to test SSL connectivity if you get any SSL connectivity error for web ssh / Ezeelogin GUI
root@desktop:$ openssl s_client -connect bastion.eznoc.com:52222 -showcerts
root@desktop:$ openssl s_client -connect bastion.eznoc.com:443 -showcerts
Step 6(C): Make sure that the .pem files are readable by the webserver user such as nobody/www-root/apache, etc. Run the below command on the gateway server to grant the web user read privileges.
root@gateway:~# chmod 644 /usr/local/etc/ezlogin/*.pem
7. Enable two factor authentication
Step 7(A): Make sure to enable 2-factor authentication for web SSH to work.
8. Verify SSHD configuration file
Step 8(A): Ensure that password authentication is enabled from the local host alone in the sshd configuration file( /etc/ssh/sshd_config ) on the jump server. Add the following parameters to the end of /etc/ssh/sshd_config file.
root@gateway:~# vi /etc/ssh/sshd_config
Match Address 127.0.0.1
PermitRootLogin yes
PubkeyAuthentication yes
PasswordAuthentication yes
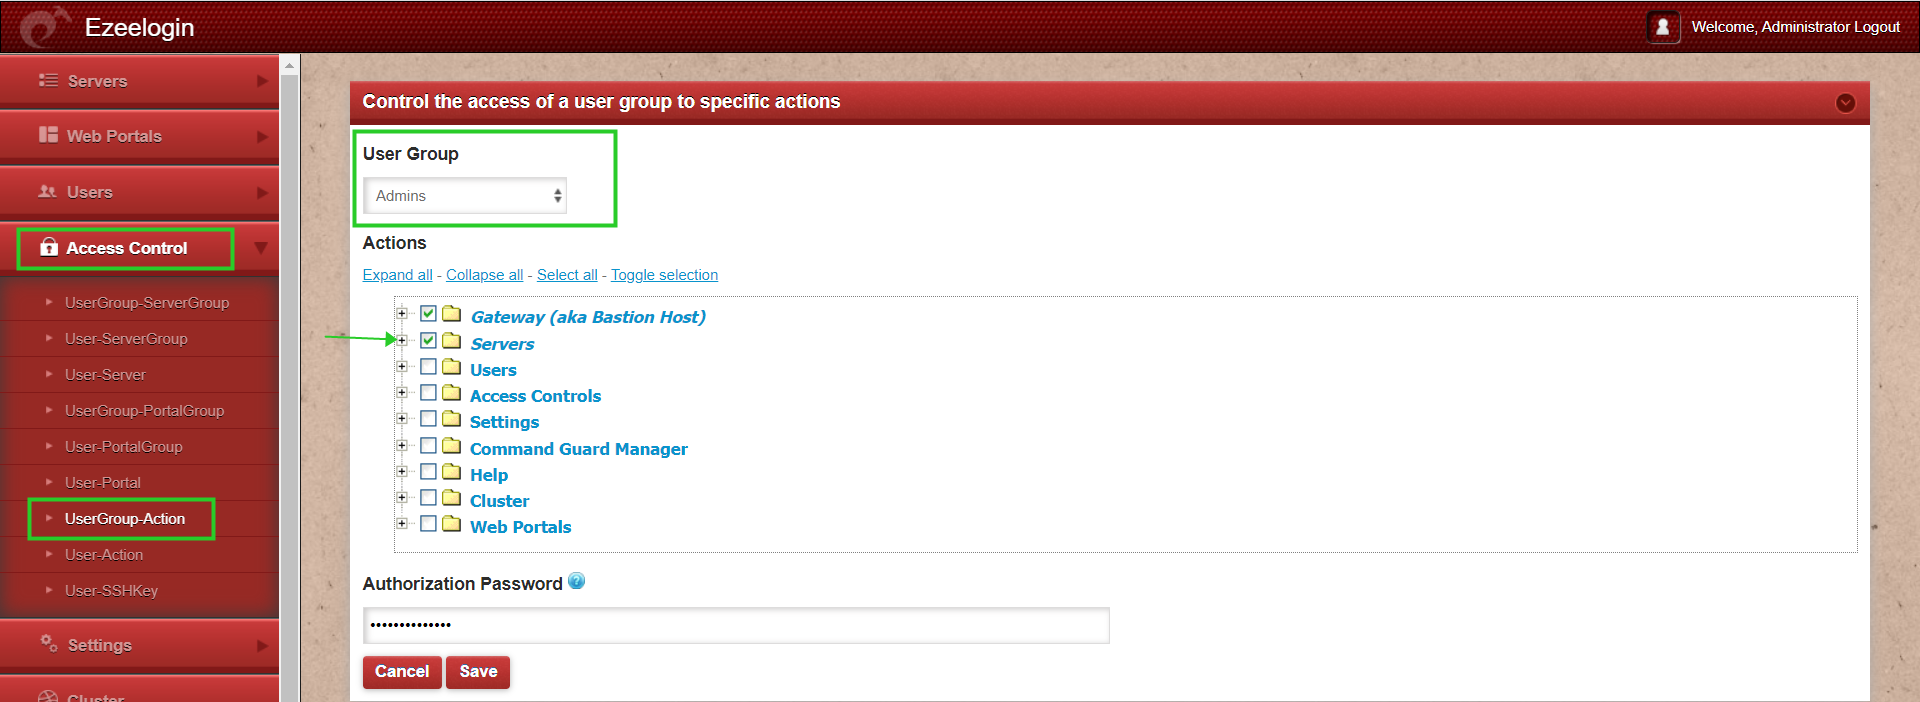
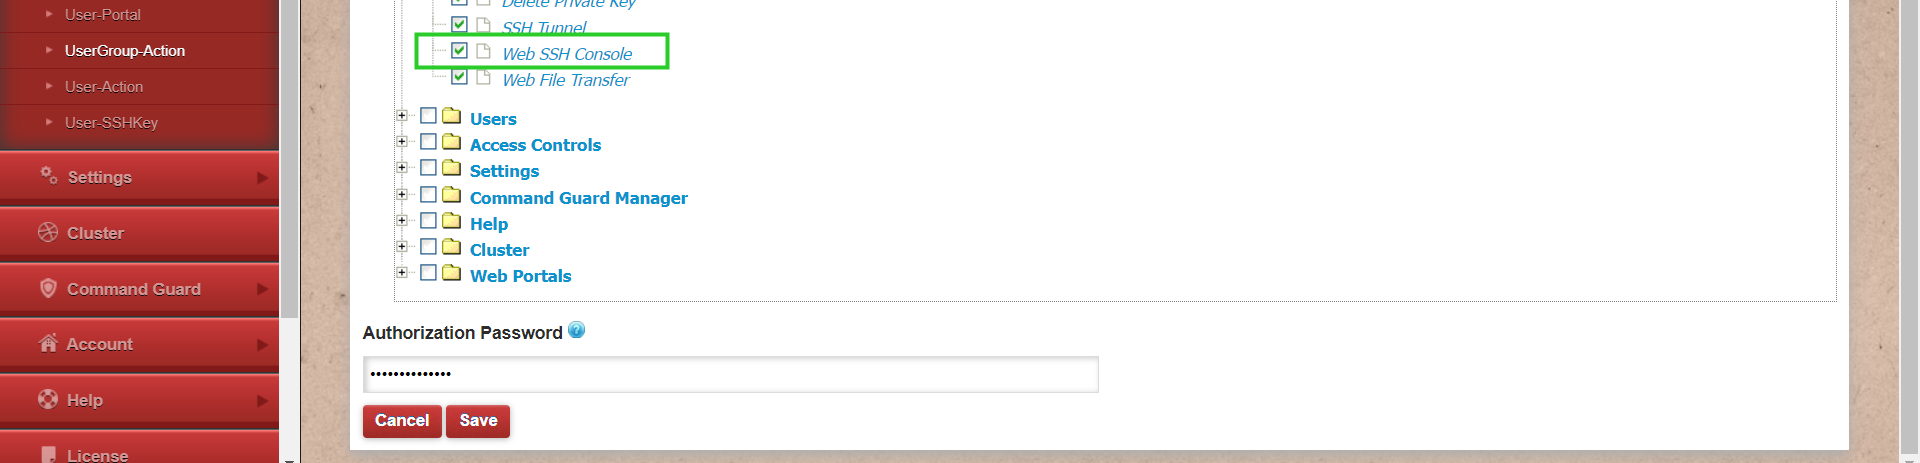
9. Granting access
Step 9(A): Ensure that the user or the usergroup has the privilege to access the web shell feature. Grant it as follows, navigate to Access Control -> UserGroup-Action -> <select user group> -> Servers -> web ssh Console
10. Access web SSH console
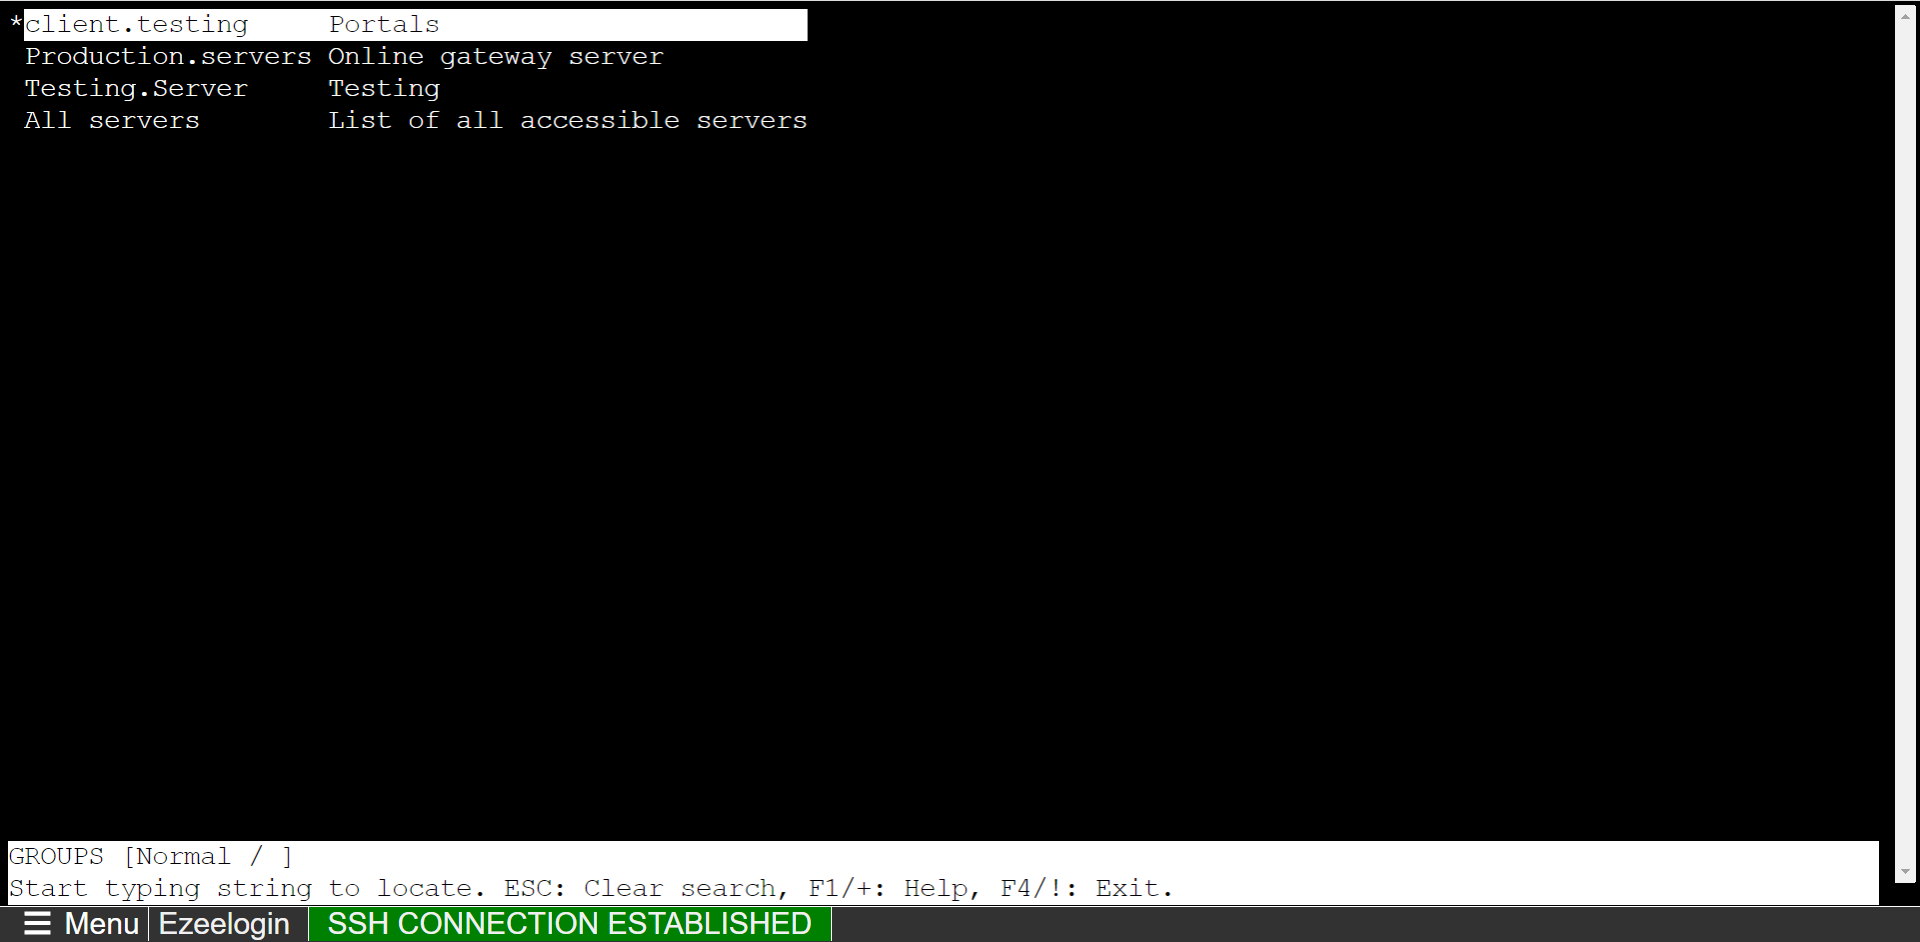
Step 10(A): Click on the Web SSH Console feature under the Servers tab.

Step 10(B): The web ssh console will open on the browser tab and will look as shown below.
WEB SSH Console feature is available within the GUI from Ezeelogin version 7.4.1 and above only.
Troubleshooting Steps:
1. Ensure that the Node version is above 19 and the NPM Version is >=6
root@gateway:~# npm -v
6.14.6
root@gateway:~# node -v
v19.0.0
2. To get more detailed errors, append log_level trace in ez.conf.
3. Access the web SSH and check the application logs under {system folder}/application/logs/, ( for example, /var/www/ezlogin/application/logs/log-2020-12-16.php ). Append DEBUG=* at the beginning of the command which you got from the application logs to manually start the web SSH.
Example:
root@gateway:~# DEBUG=* PORT=52222 node $(awk '/^system_folder/ {print $2}' /usr/local/etc/ezlogin/ez.conf)/application/external/webssh/index.js
4. Install the Node modules required by the node application
root@gateway:~# cd $(awk '/^system_folder/ {print $2}' /usr/local/etc/ezlogin/ez.conf)/application/external/webssh/&& npm install
If you have received the following ERROR:Segmentation fault (core dumped), make sure to delete the node modules in the webSSH application directory and re-update them again using the following commands:
root@gateway:~# cd $(awk '/^system_folder/ {print $2}' /usr/local/etc/ezlogin/ez.conf)/application/external/webssh/ && rm -rf node_modules && npm install && pkill -9 node